Camera Angles: High, Low, Overhead and Nadir Explained
The five camera angles with their height, effect and settings: eye level, high, low, overhead and nadir, and how not to mix up the last two.
The height at which you place the camera changes the meaning of a photo more than any menu setting. There are only five positions: at eye level, above looking down, below looking up, at 90° from above and at 90° from the ground. Each one says something different about the subject, and each comes with its own focal length, aperture and typical mistake.
In Spanish the names are ángulo normal, picado, contrapicado, cenital and nadir (eye level, high angle, low angle, overhead and nadir). The last two are the ones half the world swaps, and there are 180° between them.
The five angles, in a table
Angle: Eye level; Where the camera is: At the subject's eye height; Tilt: 0°; What it conveys: Neutrality, a peer-to-peer feel; Typical use: Portrait, documentary, street
Angle: High angle; Where the camera is: Above the subject; Tilt: 15-60° downward; What it conveys: Smaller subject, being observed; Typical use: Flattering portrait, food, groups
Angle: Low angle; Where the camera is: Below the subject; Tilt: 15-60° upward; What it conveys: Larger, dominant subject; Typical use: Architecture, sports, power portrait
Angle: Overhead; Where the camera is: On the vertical, above; Tilt: 90° downward; What it conveys: Pattern, order, a map; Typical use: Still life, food, drone
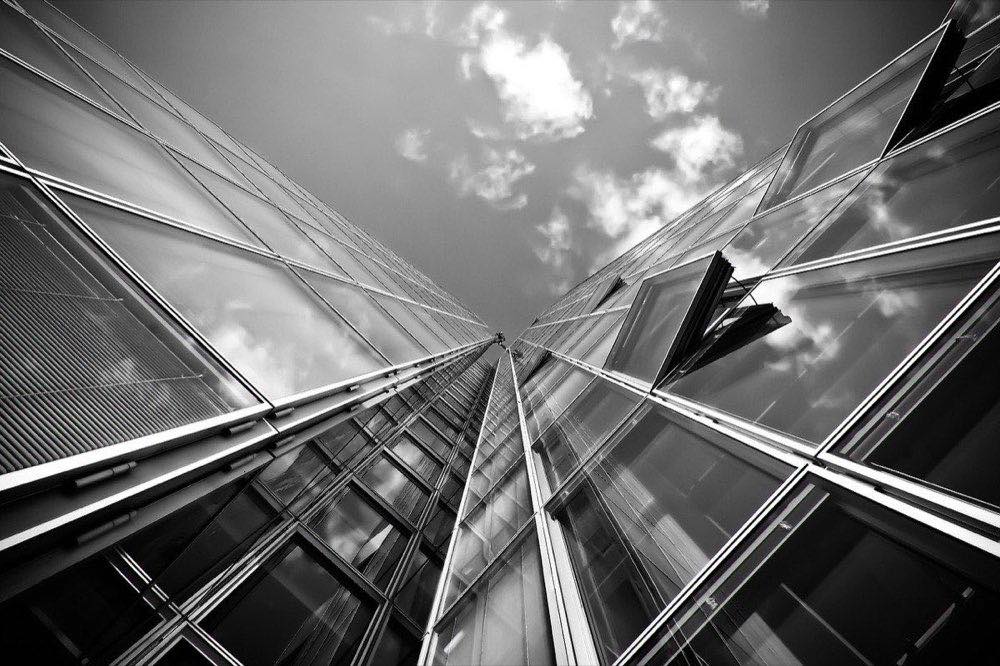
Angle: Nadir; Where the camera is: At ground level or below; Tilt: 90° upward; What it conveys: Immersion, vertigo; Typical use: Forests, skyscrapers, vaults
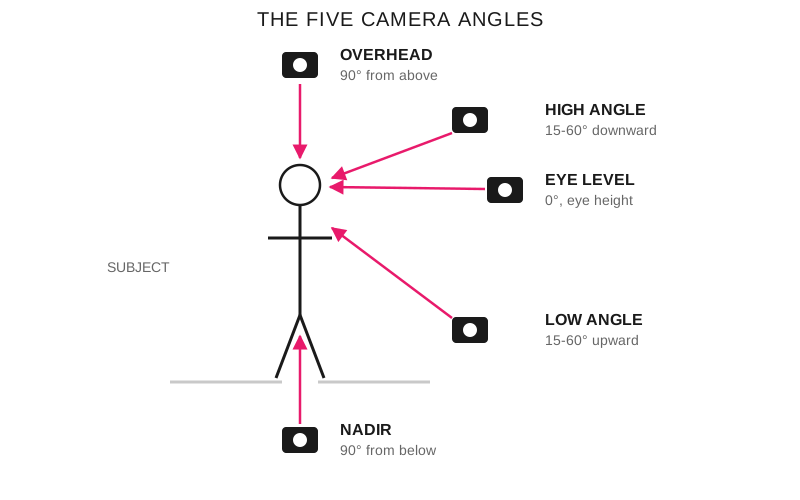
Overhead and nadir are 90° from the subject, one from above and one from below. High and low angles are everything in between.
What is the difference between overhead and nadir?
It comes down to the vertical: the zenith is the point in the sky directly above your head and the nadir is the opposite point, beneath your feet. The angle is named for where the camera is relative to the subject, so a camera at its zenith looks down (an overhead angle) and a camera at its nadir looks up (a nadir angle). A table seen from the ceiling: overhead. A ceiling seen from the floor: nadir.
The confusion has a specific origin. In drone work and photogrammetry the nadir is measured from the aircraft, not from the subject, so a drone "nadir shot" means the gimbal at −90° pointing at the ground: what in composition we call overhead. Both conventions are legitimate within their trade and neither is going to give way. If you are flying, state the gimbal angle in degrees and the problem disappears; the aerial planning and framing side is covered by the guide to drone photography.
What focal length, aperture and shutter speed do I use at each angle?
Angle: Eye level; Scene: Half-length portrait, outdoor shade; Focal length (full frame): 85 mm; Aperture: f/2; Shutter speed: 1/1000 s; ISO: 100
Angle: High angle; Scene: That same portrait, 20-30° from above; Focal length (full frame): 85 mm; Aperture: f/4; Shutter speed: 1/250 s; ISO: 100
Angle: High angle; Scene: Served table at 45°, next to a window; Focal length (full frame): 50 mm; Aperture: f/5.6; Shutter speed: 1/60 s; ISO: 400
Angle: Low angle; Scene: Ground-level jump, direct sun; Focal length (full frame): 24 mm; Aperture: f/5.6; Shutter speed: 1/2000 s; ISO: 200
Angle: Overhead; Scene: Still life at 80 cm, next to a window; Focal length (full frame): 50 mm; Aperture: f/5.6; Shutter speed: 1/60 s; ISO: 400
Angle: Nadir; Scene: Treetops against a midday sky; Focal length (full frame): 16 mm; Aperture: f/8; Shutter speed: 1/500 s; ISO: 100
The first two rows expose exactly the same light: from f/2 to f/4 is two stops less and from 1/1000 s to 1/250 s is two stops more. That aperture does not change on a whim. In a high angle the plane of the face is no longer parallel to the sensor, so eyes, nose and chin fall at different distances: at 85 mm and f/2 at 1.5 m you have about 3.5 cm of depth of field on full frame, and at f/4, about 7 cm, which already covers a tilted head.
The direct-sun rows are the sunny 16 rule in different clothes: f/8 at 1/500 s with ISO 100 and f/5.6 at 1/2000 s with ISO 200 are the same exposure as f/16 at 1/125 s. The low-angle one spends that margin on freezing the jump, because 1/2000 s holds a sneaker still in the air and 1/250 s does not.
All focal lengths are full frame. On APS-C, that 85 mm is equivalent to about 56 mm, the 24 mm to 16 mm and the 16 mm to about 11 mm; the crop factor converter does the conversion for your specific sensor.
How do I choose the angle in ten seconds?
Three questions, in this order, and all three are answered before you raise the camera:
Who is in charge of the scene? If the subject is, get below their eyes. If the surroundings or the viewer are, get above.
Where are the subject's eyes? A dog stands 40 cm tall and a child 110 cm. Eye level is their height, not yours, and getting there costs you bending your knees.
Is the subject the form or the arrangement? If what matters is how things are laid out, go up to 90°. If what matters is volume, stay low.
When the scene gives no clear answer, shoot the eye-level angle and then an alternative one from the same distance. Two files cost the same as one, and the comparison at home teaches more than any rule. The guide to dynamic visual composition explores how the point of view reorders the rest of the framing decisions, and the types of shot framing place the angle as one of the four axes you choose at every shot.
Common mistakes that cost you the photo
Shooting from your default height. It is the mistake behind 90% of accidental high angles. With children and pets, crouch.
Wide angle, high and close. A 24 mm less than a meter above a head enlarges the skull and shrinks the body. From 50 mm onward, the distortion disappears.
A low angle from below the chin. The lens looks up the nose and widens the jaw. For power at no cost, stay at 10-20° and at 50 mm or longer.
Blowing out the sky by pointing up. Meter on the sky and then on the underside of a leaf: you will see three stops or more of difference. Expose for the sky and lift the shadows in RAW, because a clipped sky doesn't come back.
An overhead shot tilted five degrees. That deviation is enough for the rectangle of the table to come out as a trapezoid. Turn on the electronic level.
Frequently asked questions
What is the difference between an overhead angle and a nadir angle?
Overhead has the camera above the subject pointing 90° down; nadir has it below pointing 90° up. They are exact opposites, 180° apart. In drone vocabulary the word "nadir" is used the other way round, for the camera looking at the ground, so it is best to state the gimbal angle in degrees.
Which angle is most flattering in a portrait?
A gentle high angle of 15 to 25°, with the camera slightly above the eyes. It slims the oval of the face, enlarges the eyes and sets the jaw against the neck instead of against the background. Past 40° the effect reverses and the person being photographed starts to read as small.
How many camera angles are there?
Five by height: eye level, high, low, overhead and nadir. Some manuals add the Dutch or canted angle, but that is not a height but a rotation of the camera around its optical axis, and it can be combined with any of the five.
Does the high angle always make the subject look smaller?
Below 25° it is barely noticeable and the dominant effect is cosmetic, not about power. The feeling of shrinking appears from 40° up, when the ground takes up most of the background and the figure loses its relationship with the horizon.
What to bring on your next outing
Two habits solve almost everything: bend your knees to the subject's eye level before deciding anything, and always shoot a second version from another height at the same distance. The exact degrees matter less than having chosen; the angle inherited from your height is the only one that never says anything.
The four reference entries on the topic (high angle, low angle, overhead and nadir) give the height, effect and settings of each. At Enfogram you have the 44 printable cards with those settings by scenario, to solve the angle with the camera in your hand and without opening your phone.