30 Photo Poses That Work
Thirty poses sorted by the problem they solve, with the shoulder angle, what the hands do and full-frame settings for each scene.
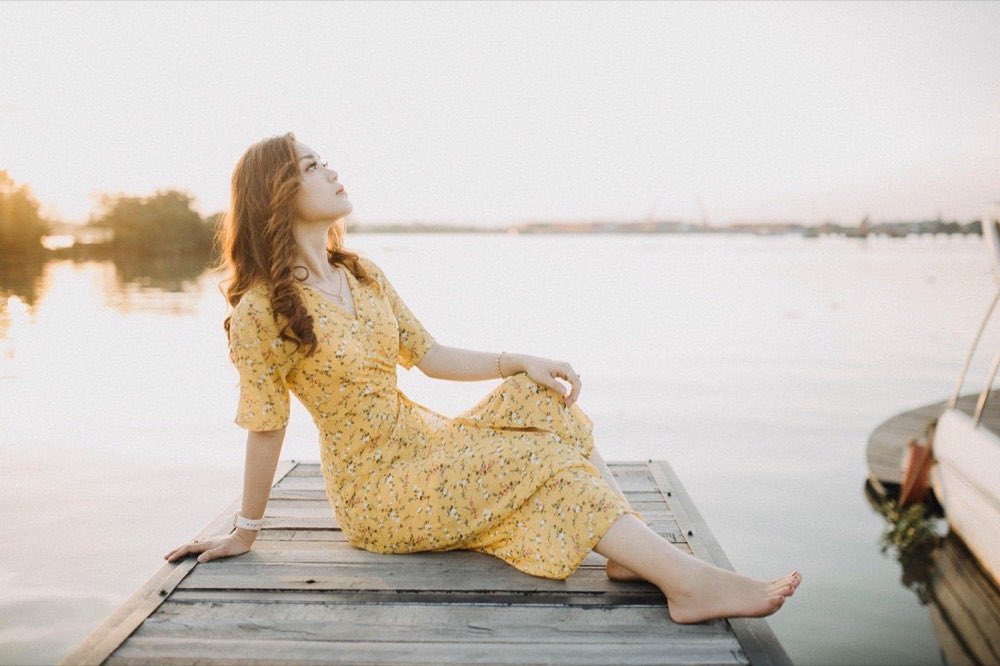
Shoulders at 30° to the camera, weight on the back leg, chin forward and slightly down. Almost every other pose comes out of that base posture; what changes after that is the hands and the height of the lens. On full frame in open shade, 85 mm at f/2.8, 1/500 s and ISO 100 give you about 10 cm of sharp zone at 2.1 m: the face fits, a turned body doesn't.
The 30 postures below are sorted by the problem they solve, not by how pretty they look on a reference board. If the person is stiff, five of them fix it; if the arm flattens against the torso, three others do.
Where do I start if the person has never posed?
With the feet, always. A body organizes itself from the bottom up, and most of the tension you see in the viewfinder was born in the ankles.
The sequence that works with anyone, in this order and in under twenty seconds:
One foot forward, weight on the back one. It breaks the symmetry and creates the hip curve.
Shoulders at 30°, face to the camera. Body at an angle, face straight on.
Separate the arms from the torso by a couple of centimeters. An arm pressed against the side looks twice as wide.
Chin toward the camera and then down. It stretches the neck and erases the double chin; if you lower it without pushing it forward, you get the opposite.
Give the hands something to do: a pocket, the hair, the lapel, a cup.
Nobody remembers five instructions in a row, so give them one at a time and shoot between each. The in-between shots are often better than the finished pose. The full logic of directing someone who isn't a model is in how to pose people who aren't models.
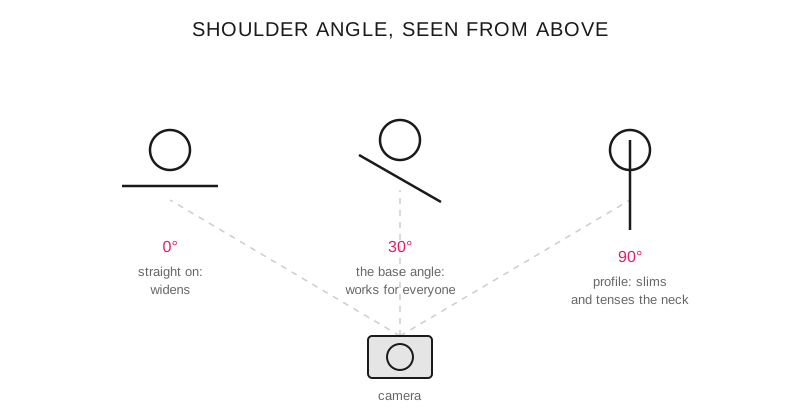
The shoulder turn is the control with the most effect per second invested: 30° slims without the pose looking posed.
The 30 poses, grouped by what they fix
#: 1; Pose: Contrapposto; What it fixes: Stiff legs; How to do it: Weight on the back leg, front knee relaxed
#: 2; Pose: Crossed foot; What it fixes: Parallel, flat legs; How to do it: Cross the front foot in front of the other
#: 3; Pose: A step toward the camera; What it fixes: Dead posture; How to do it: Ask them to walk and shoot on the second step
#: 4; Pose: Pivot on the heel; What it fixes: Frozen shoulders; How to do it: Have them twist the torso while you shoot a burst
#: 5; Pose: Side sway; What it fixes: Static body; How to do it: Weight from one foot to the other, three times
#: 6; Pose: Hand in pocket; What it fixes: Hands with nowhere to go; How to do it: Only four fingers in, thumb out
#: 7; Pose: Thumb in belt loop; What it fixes: Dangling arm; How to do it: Elbow away from the torso
#: 8; Pose: Hand on the back of the neck; What it fixes: Flattened arm; How to do it: Elbow out, wrist relaxed
#: 9; Pose: Adjusting a shirt cuff; What it fixes: Stiff hands; How to do it: Eyes on the hands, not the camera
#: 10; Pose: Fingers in the hair; What it fixes: Flat portrait; How to do it: Only up to the temple, without messing it up
#: 11; Pose: Arms crossed high; What it fixes: Wide torso; How to do it: Cross at chest height, not belly-button height
#: 12; Pose: Elbow resting on a wall; What it fixes: Lack of anchor; How to do it: Elbow supported, shoulder dropped
#: 13; Pose: Chin on the back of the hand; What it fixes: Double chin; How to do it: Chin forward first, then down
#: 14; Pose: Open hand at the neck; What it fixes: Short neck; How to do it: Fingers together, edge of the hand to the camera
#: 15; Pose: Sitting on the edge; What it fixes: Slumped posture; How to do it: Only the front third of the seat
#: 16; Pose: Knees together and turned; What it fixes: Wide legs when sitting; How to do it: Knees toward the side away from the camera
#: 17; Pose: Elbows on knees; What it fixes: Curved back; How to do it: Straight back, weight on the elbows
#: 18; Pose: Crouching; What it fixes: Monotonous framing; How to do it: Heels down, arms over the knees
#: 19; Pose: Sitting on the floor, legs to the side; What it fixes: Legs toward the camera; How to do it: Legs to the side, supported on one arm
#: 20; Pose: Back against the wall, one foot propped; What it fixes: Empty scene; How to do it: Heel against the wall, knee bent
#: 21; Pose: Gaze out of frame; What it fixes: Forced smile; How to do it: Have them look at a point at 45° and come back
#: 22; Pose: Eyes closed and open; What it fixes: Hard gaze; How to do it: "Close, breathe, open" and you shoot on the open
#: 23; Pose: Prompted laugh; What it fixes: ID-photo smile; How to do it: Ask for a fake laugh; the real one follows
#: 24; Pose: Look down and up; What it fixes: Tense neck; How to do it: Raise the gaze at the same time you shoot
#: 25; Pose: Pure profile; What it fixes: Asymmetrical face; How to do it: 90°, only one eye visible, no nose tip sticking out
#: 26; Pose: Forward shoulder; What it fixes: Shapeless back; How to do it: Shoulder near the camera, chin over it
#: 27; Pose: Hands on the chair back; What it fixes: Three-quarter session; How to do it: Chair backward, forearms crossed
#: 28; Pose: Walking toward the camera in a coat; What it fixes: Static winter photo; How to do it: Hands in pockets, burst at 1/500 s
#: 29; Pose: Both hands on the railing; What it fixes: Outdoor portrait with no idea; How to do it: Weight forward, torso at 30°
#: 30; Pose: Back to the camera, head turn; What it fixes: Repetitive series; How to do it: Body facing away, head at three-quarters
There are five groups: legs and weight (1–5), hands and arms (6–12), neck and chin (13–14), sitting and floor (15–20) and gaze and expression (21–26). The last four are complete scenes for when you've run out of ideas.
What do I do with the hands?
It is the question everyone asks and the answer is short: give them an object or give them a destination. A hand with no task turns into a closed fist, and a closed fist shows in the photo.
Three rules you can apply without looking:
Never the back of the hand toward the camera. The edge is narrow and elegant; the back is a wide blob.
Fingers slightly apart, never in a block or a fist.
Wrists bent inward, not rigid in line with the forearm.
And one that gets forgotten: if the hand is closer to the lens than the face, it looks bigger. At 50 mm and 1.2 m, a hand pushed forward 20 cm comes out disproportionate. With 85 mm from 2 m that effect almost disappears.
What settings make the pose read?
A full-body pose at f/1.4 doesn't work: the face is sharp and the forward foot isn't. These are the starting points on full frame; ISO is fixed so you can check the EV.
Scene: Open shade at midday; Focal length: 85 mm; Aperture: f/2.8; Shutter speed: 1/500 s; ISO: 100; What it costs: 10 cm of sharpness at 2.1 m
Scene: Heavy overcast; Focal length: 85 mm; Aperture: f/2.8; Shutter speed: 1/250 s; ISO: 100; What it costs: Flat light, little modeling
Scene: Golden hour, low sun in front; Focal length: 85 mm; Aperture: f/2; Shutter speed: 1/500 s; ISO: 100; What it costs: Squinting eyes without diffusion
Scene: Backlight at dusk, metered on the face; Focal length: 85 mm; Aperture: f/2; Shutter speed: 1/250 s; ISO: 100; What it costs: Background blown by 2 stops
Scene: Indoors next to a large window; Focal length: 50 mm; Aperture: f/2; Shutter speed: 1/125 s; ISO: 400; What it costs: Blurred hands if they gesture
Scene: Full body with forward foot; Focal length: 50 mm; Aperture: f/5.6; Shutter speed: 1/250 s; ISO: 400; What it costs: Recognizable background, you have to choose it
For a group of three or more, f/5.6 is the minimum and f/8 the safe bet: each row of people adds about 40 cm of depth that has to be covered. Check the exact margin for your combination in the depth of field calculator before setting the aperture, because the error shows at 100% and not before.
The default framing for a half-body pose is the medium shot: from the waist up, about 0.90 m of subject height.
Couples and groups: who touches whom
Two people standing side by side produce a campaign-poster photo. What fixes it is contact and height difference.
At least one point of contact: hand on the shoulder, hip against hip, forehead against temple.
Heads at different heights. Have one sit, lean or lower the chin.
Triangles, not rows. In groups of three to six, arrange the heads in triangles and not a straight line.
Feet turned inward, pointing to the center of the group. A foot pointing outward takes the person out of the scene.
With more than six people the problem changes: it is no longer the pose, it is focus. Focus at a third of the group's total depth and stop down to f/8.
Frequently asked questions
What is the best pose for a professional profile photo?
Shoulders at 30° to the camera, face turned back toward the lens and chin slightly forward. On full frame, 85 mm at 1.4 m with f/2.8 gives a chest-up framing and about 4 cm of sharpness, enough for both eyes if the face is almost frontal.
How do I pose someone who says they come out badly in photos?
Don't ask for a pose: ask for an action. Walking toward you, turning, adjusting a sleeve or laughing on purpose produces natural posture without them having to think about how they look, and you shoot a burst during the movement instead of waiting for the right instant.
Which pose slims the most in a photo?
The body turned between 30° and 45° with weight back, the arm nearest the camera away from the torso and the chin forward. Distance also decides: at 35 mm from 1 m the face widens, and the same framing at 85 mm from 2.4 m slims it without anyone having changed posture.
How many poses do I need for a one-hour session?
Between six and eight base postures, each with three variations of hands or gaze, give about twenty different images and leave time to spare. Repeating the same one with a change of background counts as a new one for the client and not for you.
The five poses that rescue a session
If you go blank with the person in front of you, go to these in order: contrapposto with a hand in the pocket, a step toward the camera in burst, chin on the back of the hand, sitting on the edge with elbows on knees and back to the camera with a head turn. They cover standing, moving, close-up, seated and from behind, which is all the variety a gallery needs.
If you are going to photograph a man, the starting point changes in the chin and shoulders: it is developed in poses for photos of men. And if you want the light and lens context that supports all of this, the contemporary portrait photography guide is the pillar of the topic.
The 44 cards from Enfogram have the shoulder angle, the shot-scale chart and the settings by scene printed on them, so you can consult the pose with the person in front of you and not with your phone in hand.