Contemporary Portrait Photography
Modern portraiture seeks emotional connection: not just focusing on the eyes at f/1.4, but creating an atmosphere where the subject shows their essence.
The starting point of contemporary portraiture is 85 mm at f/2.8, 1/125 s and ISO 200 with side window light and the subject at 45° to the camera. From there you open to f/1.4 if you want the background dissolved, or stop down to f/5.6 if the surroundings tell part of the story. Focal lengths are for a full frame sensor.
Modern portraiture goes beyond perfect technique: it seeks emotional connection. Focusing on the eyes at f/1.4 is the easy part; the hard part is creating an atmosphere where the subject shows their essence. Subtle direction, the perfect moment and reading body language are as important as mastering technique.
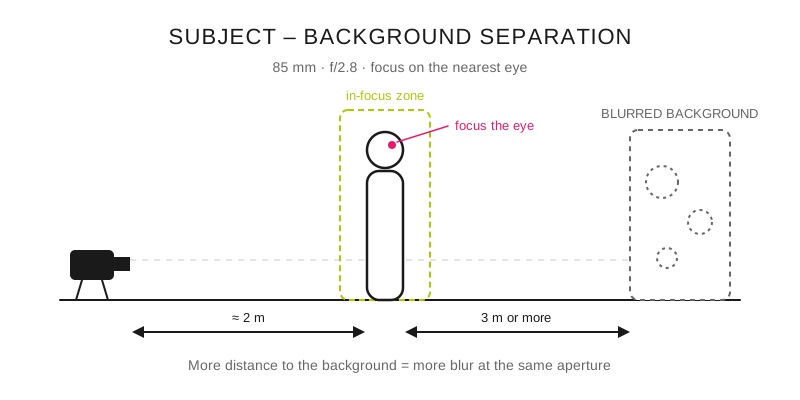
At 85 mm and f/2.8, moving the subject away from the background multiplies the blur and separates them from the scene.
How do I get the person to relax?
Dare to go beyond the pose and build portraits that truly tell stories. Contemporary portraiture is an exercise in empathy and observation. Seek to establish a dialogue with the person being photographed and capture their essence in an unrepeatable instant. What makes a portrait unforgettable isn't the camera, but the ability to create a genuine bond and let emotion show itself.
With someone who isn't a model, abstract instruction ("relax," "be natural") produces the opposite effect. It works better to give them something to do with their hands and somewhere to walk toward; in how to pose people who aren't models you'll find concrete directions that can actually be carried out.
What focal length and aperture do I use for each type of portrait?
Classic portrait: 85mm at f/2.8, side window light, subject at 45° to the camera.
Editorial style: 35mm at f/5.6, environment included, complete visual narrative.
Intimate/close: 50mm at f/1.4 – f/2, focus on the expression, background completely blurred.
Environmental: 24mm at f/8, subject in their natural space, context important.
Each style with its complete exposure, on full frame:
Style: Classic, side window; Focal length: 85 mm; Aperture: f/2.8; Shutter speed: 1/125 s; ISO: 200; Light (EV at ISO 100): 9
Style: Editorial outdoors, overcast; Focal length: 35 mm; Aperture: f/5.6; Shutter speed: 1/500 s; ISO: 400; Light (EV at ISO 100): 12
Style: Intimate, indoors in the afternoon; Focal length: 50 mm; Aperture: f/1.4; Shutter speed: 1/125 s; ISO: 400; Light (EV at ISO 100): 6
Style: Environmental, open shade; Focal length: 24 mm; Aperture: f/8; Shutter speed: 1/125 s; ISO: 200; Light (EV at ISO 100): 12
The two EV 12 rows are the same light with a different intention: open shade at midday or an overcast sky measure the same, three stops below the direct sun that the sunny 16 rule places at EV 15. What changes between them is what each choice costs: a 50 mm at f/1.4 and 1.5 m leaves 7.3 cm of sharp zone (and an 85 mm at f/1.4 at that same distance, only 2.5 cm), while f/8 with the 24 mm brings the whole background into focus, trash can included.
What shutter speed and ISO avoid a blurred photo?
Focus: always on the nearest eye, focus separated from the shutter button.
Shutter speed: minimum 1/125s to avoid facial micro-movements.
ISO: prefer sharp ISO 800 to shaky ISO 200.
Metering: spot on the lit cheek, compensation according to skin tone.
That's the order of priorities: first the shutter speed that freezes the face, then whatever ISO is needed to achieve it. A grainy portrait gets published; a blurred portrait gets deleted. The basic mastery of natural light guide has the starting values by scene so you don't have to guess the ISO.
Common mistakes
Over-directing can create tension instead of naturalness.
Always using the same aperture without considering the number of subjects.
Poorly positioned hands (clenched fists, rigid fingers).
Not establishing an emotional connection beforehand, shooting without communication.
Pro tips
Connection technique: chat for 5 minutes before taking out the camera.
Shoot in short series: 3 – 5 photos in a row capture natural micro-expressions.
For groups, use f/5.6 as a base and adjust according to the physical depth of the group.
Frequently asked questions
50 mm or 85 mm for portraits?
For half-length and tighter portraits, 85 mm wins almost always: it forces you to stand about 2 m away, and that distance is what flattens the features and avoids an enlarged nose. The 50 mm holds its own in small interiors, where there's no room to step back, and in environmental portraits with context. The full comparison, with working distances, is in 50 mm vs 85 mm for portraits.
What is the minimum shutter speed for a portrait?
1/125 s with a still subject: below that, the face's micro-movements appear, blurring eyelashes and the corners of the mouth even if the camera is steady. With children or someone walking toward you, go up to 1/250 s or 1/500 s. Dropping below 1/60 s with an 85 mm means accepting that half the shots get discarded.
Where do I meter the light in a portrait?
Spot metering on the lit cheek, never on the background. The meter returns middle gray, so light skin calls for compensating between +0.7 and +1 EV over that reading so it doesn't come out gray; dark skin sits near middle gray and the direct reading usually works as is.
How do I keep the eyes sharp if the subject moves?
Continuous focus with eye detection, a shutter button separated from focus and a realistic aperture margin. With 85 mm at f/2.8 and the subject at 2 m you have 8.9 cm of sharp zone, enough for a natural sway; with that same 85 mm at f/1.4 and at 1.5 m you drop to 2.5 cm and it's enough for the person to take a deep breath to lose focus. Work out your margin in the depth of field calculator.
Why does a window-light portrait look more alive?
Because of the catchlight: the window's reflection in the cornea. A large window leaves a broad, soft reflection that gives depth to the gaze, and without it the eyes read as dull even if the exposure is correct. If the reflection doesn't appear, slightly turn the subject's head toward the source until you see it in the viewfinder.
The five minutes before the first photo
Talk without the camera in your hand, decide where the light comes from, place the subject at 45° to that source and check that there's a catchlight in the eyes. The settings come afterward and come from the table; the connection doesn't come from any table and it's what decides whether the session works.
The 44 Enfogram cards come with these focal length, aperture and shutter speed combinations by portrait type printed on them, to review with the model in front of you.
To portray is to observe, understand and create a real connection before shooting.