Post-Processing: Creative Digital Development
Post-processing doesn't fix a bad photo: it completes your artistic vision. RAW is the negative that needs interpretation.

The function of post-processing is not to "fix" a bad photo, it is to complete your artistic vision. The RAW file is like the negative: it contains all the information, but it needs interpretation. Editing should be invisible when you're after naturalness, or stylistically coherent when you're pursuing a specific look. Moderation is as important as technical knowledge.
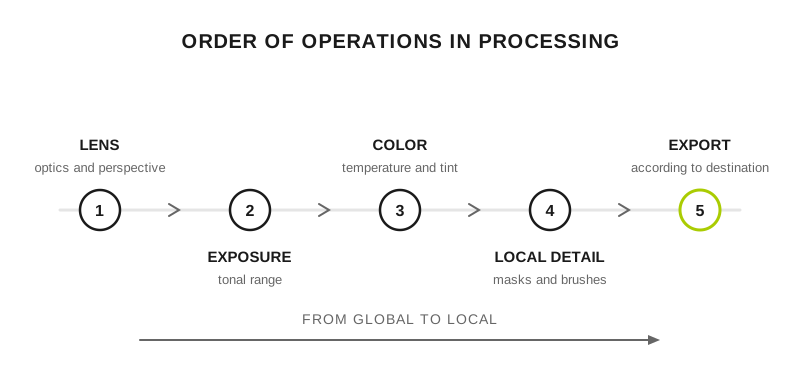
Always process from global to local: correct the base before refining specific areas.
Processing is interpreting
A well-structured development workflow is as important as a good capture. Working the RAW as a digital negative, applying global corrections, precise local adjustments and a final refinement with moderation is the key to maintaining naturalness and coherence.
Beyond technique, processing is interpreting. Each adjustment communicates an intention: from balancing the light to defining a personal look that gives identity to your portfolio.
Practical application
Basic correction: exposure, shadows, highlights, contrast, clarity.
Color adjustment: temperature, tint, selective saturation by channel.
Local corrections: adjustment brushes, graduated filters, masks.
Personal style: tone curves, split toning, subtle vignetting.
What working setup do I use?
Calibrated monitor: essential for accurate evaluation of color and tone.
Working space: Adobe RGB for editing (if your monitor covers it), sRGB for web.
Histogram always visible: avoids losing information at the extremes of the graph during adjustments.
Non-destructive work: adjustment layers, masks, original files left intact.
What mistakes are worth avoiding?
Excessive color saturation: artificially intense colors.
Over-sharpening: visible artifacts, halos around edges.
Extreme HDR effect: artificial look, flat tones.
Ignoring monitor calibration: it can display incorrect colors.
Professional tips
Basic workflow: global correction → local adjustments → final refinement.
Use references: compare with photos you admire in the same style.
For consistency: create presets with your favorite adjustments and adapt them.