Product and Commercial Photography
Product photography is commercial storytelling: every element conveys quality and desirability. Technical precision is critical to selling.
f/8 to f/16, ISO 100–200, manual focus with magnified Live View and fixed white balance. With those four settings you have the product sharp from end to end and the same color across all forty photos in the catalog, which is what an online store asks for. The rest of the work is light and cleanliness.
Product photography is commercial storytelling: every element conveys quality, desirability and the purpose of the object. The lighting has to eliminate harsh shadows and unwanted reflections without flattening the object's texture or form. Every detail is amplified when the photo exists to sell.
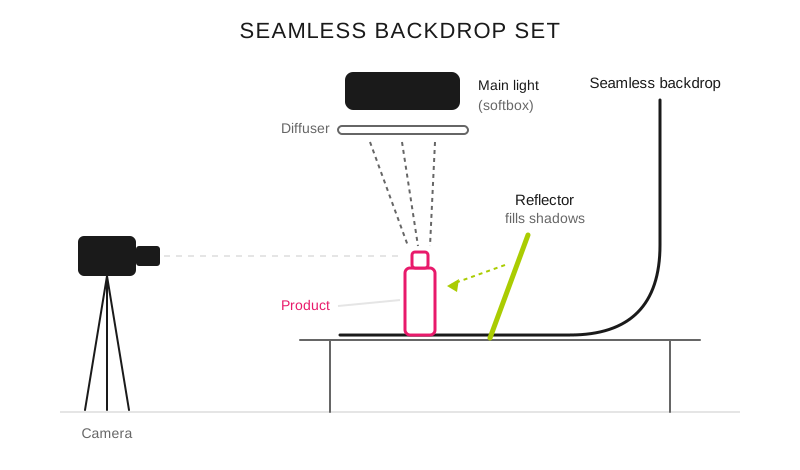
The curved paper eliminates the horizon, the softbox softens the light and the reflector fills the product's shadows.
Applications
Product photography: its goal is to show a product clearly and attractively to make it easier to sell. It is used in online stores, catalogs, social media and ads. The keys to a good product photo are using natural or artificial light to bring out colors and textures, in an aesthetic composition. By showing different perspectives of the product, the buyer can see it in detail and fall in love with it.
Commercial photography: commercial photography includes architectural, fashion and food photography, corporate portraits and any other whose purpose is to sell a product or service or to help a company generate profit.
How do I set up each type of shot?
Product on white: use a seamless backdrop. Separate the object from the background. Fill the shadows with a reflector or some reflective surface.
Lifestyle/contextual: product in natural use, realistic ambient lighting.
Technical packshot: maximum sharpness, accurate colors, multiple angles.
Jewelry/reflections: precise control of reflections, removal of fingerprints and dust.
What settings do I use in product photography?
Medium to small apertures: f/8 – f/16 for complete product sharpness.
Base ISO: 100 – 200 to maximize quality and dynamic range.
Focus: manual, magnification in Live View for precise focus.
Color: exact white balance, calibrated color profile.
What aperture and ISO do I use for each type of product?
Shot: Product on white; Aperture: f/11; ISO: 100; Light: Main softbox + opposite reflector + background light; What gets tricky: Separating the object from the background without blowing out the white
Shot: Technical packshot; Aperture: f/11 – f/16; ISO: 100; Light: Two symmetrical softboxes, no dominant shadow; What gets tricky: Diffraction above f/16 on small objects
Shot: Lifestyle or contextual; Aperture: f/2.8 – f/5.6; ISO: 200 – 800; Light: Ambient or window light, realistic; What gets tricky: The product loses sharpness at the edges
Shot: Jewelry and polished surfaces; Aperture: f/16; ISO: 100; Light: Full light tent, camera hidden behind a cutout; What gets tricky: Your own reflection and every fingerprint
Shot: Texture and macro detail; Aperture: f/16 – f/22; ISO: 100; Light: Raking side light; What gets tricky: Millimeters of depth; usually calls for focus stacking
All those shots are made with the camera on a tripod and the shutter fired with a timer or cable: at f/16 and ISO 100 in the studio the shutter speed falls below what a handheld shot can stand, and the sharpness you gain by stopping down you lose to vibration. If the object is small and you need 1:1 magnification, the technique is in the macro photography guide.
Common mistakes
Harsh shadows that compete with the product's form.
Reflections of the photographer or visible equipment on shiny surfaces.
Angles that distort the real proportions.
Dust, fingerprints or imperfections not removed before the shot.
Pro tips
Basic setup: main softbox + fill reflectors + background light for separation. The angles and proportions of each source are in the studio lighting guide.
Antistatic spray and microfiber for perfect cleaning of the product before each shot.
For reflective surfaces, work with a full light tent. How all of this translates to a small, short-budget assignment is in product photography for small brands.
Frequently asked questions
What aperture do I use to get the whole product sharp?
f/11 for most tabletop objects, shooting from half a meter or more and with the tripod set up. Stopping down to f/16 gains a bit of depth on objects with a lot of depth, and beyond that diffraction starts to subtract more sharpness than the aperture adds. If the object is deep and it doesn't reach, stack several shots with the focus shifted instead of stopping down further.
How do I get a pure white background without blowing out the product?
Light the background separately from the product, with one or two lights of their own, and place it a meter from the object. The practical rule is that the background gets between one and two stops more light than the product: less and it comes out gray, more and the excess bounces onto the object's edges and eats them.
How do I avoid seeing my reflection in a shiny object?
Enclose the object in a light tent or surround it with white cards and shoot through a hole cut to the exact size of the lens. A polished surface is a mirror: what you see reflected is exactly what is in front of it, so the solution is not to move the light but to cover whatever is being reflected.
How much do I charge for a product session?
It depends on the number of items, the different setups required and the use the client will make of the images, and market rates are not the same in Spain as in Mexico or Argentina. Work out your floor with the pricing calculator starting from your costs and real time, and quote the usage license separately from the production work.
A good arrangement can change everything.
The 44 Enfogram cards come with the apertures and lighting setups for each type of shot printed, so you have them at hand with the product already in place.