Strategic Light Metering
Metering systems do not know what is important in your scene: understanding each mode gives you creative control over exposure.
Evaluative by default, spot as soon as the subject is much brighter or darker than the background. The light meter always returns middle gray, and from that comes the correction that saves the most photos: snow needs +1.7 EV to go back to being white instead of gray.
Modern metering systems are sophisticated, but they are still "dumb" (they do not know what is important in your scene). Understanding how each metering mode works lets you take creative control of exposure. Evaluative metering is a good starting point, but spot metering gives you surgical control over exposure.
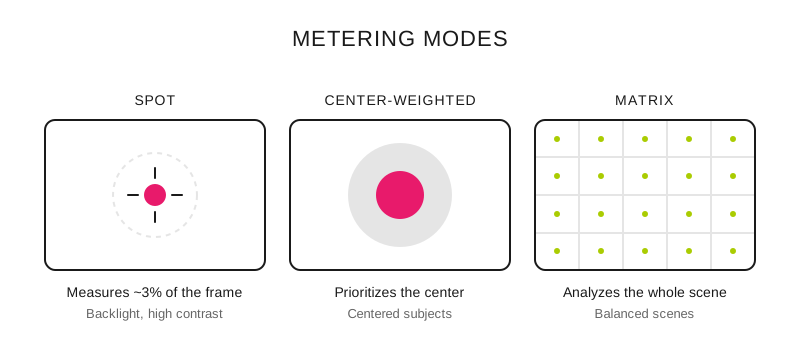
Each mode evaluates a different area of the frame: choose according to where the light that matters is.
Lighting through the subject
The background light source must be placed behind the subject; it generally works best when there is little or no light on the background.
This technique works with translucent subjects such as foliage, fabrics and windows.
It creates a dramatic atmosphere, especially in macro photography.
Spot metering: meter only the subject, not the background.
How do I meter if the background is also lit?
The background light source is behind the subject and usually lights the background too.
In most cases, an additional light source from the front will be needed, such as an electronic flash or a silver or white reflector.
Good for portraits or for making a subject stand out from the background in midday light.
Spot metering: place the spot meter on a midtone area of the background, making sure the brightest part of the background light source is outside the metering frame.
How do I meter a silhouette?
The background light source must be behind the subject.
Manual mode is recommended.
Excellent for highly dramatic effects.
Avoid frontal light sources.
Simple compositions work best.
Spot metering: place the spot meter on a midtone area of the background, making sure the brightest part of the background light source is outside the metering frame.
What does each mode measure?
Evaluative metering: Balanced scenes, casual photography.
Spot metering: Portraits with complex light, high-contrast scenes.
Center-weighted metering: Centered subjects with uniform backgrounds.
Manual metering: Studios, constant light conditions.
Which mode do I use in each scene?
Scene: Outdoor portrait; Mode: spot; Where I place the metering: lit cheek of the subject; Starting compensation: +2/3 to +1 EV with light skin, 0 with dark skin
Scene: High-contrast landscape; Mode: evaluative; Where I place the metering: the whole scene; Starting compensation: whatever the histogram asks for
Scene: Backlit subject; Mode: spot; Where I place the metering: the subject's face; Starting compensation: 0, and fill with flash or reflector
Scene: Silhouette; Mode: spot; Where I place the metering: midtone of the background, with the source outside the frame; Starting compensation: 0: the subject must go to black
Scene: Snow or sand; Mode: spot on the snow; Where I place the metering: the white surface; Starting compensation: +1.7 EV
Scene: Studio with constant light; Mode: manual with an external light meter; Where I place the metering: incident reading next to the subject; Starting compensation: none
The two compensations in the table come from the same reasoning: the light meter assumes that what it measures is middle gray, so it returns gray for anything you point it at. Snow is about two stops above that gray and light skin is close to one; that is why both need to add exposure and not subtract it. The detail of those corrections is in the exposure compensation guide and, for the extreme case, in compensation on sand and snow.
The mistakes that fool the light meter
Always using evaluative metering without considering the scene.
Metering at extreme points (very bright or dark).
Not understanding which area each mode is measuring.
Ignoring compensation when metering fails.
Pro tips
Preferred technique: spot metering on a representative area + lock the exposure.
For consistent series, use manual metering once and keep the setting.
In complex situations, take multiple readings and average them.
When you master light you master the image.
Frequently asked questions
Which metering mode do I leave on by default?
Evaluative or matrix: it averages the whole scene with criteria that get it right in most normal situations and it is the mode you have to remember the least. Switch to spot when the scene has a large difference between subject and background (backlight, stage, snow) because there the average is exactly what ruins the photo.
Why does snow come out gray?
Because the light meter is calibrated to return middle gray for any surface it measures, and a white scene forces it to close down the exposure until it darkens it. The correction is to add around +1.7 EV over the reading and verify on the histogram that the mass sits near the right edge without touching it.
How do I meter backlit scenes without the face coming out black?
With spot metering on the face, not on the scene: that way the subject is well exposed and the background blows out, which is a defensible decision. If you want to keep the background, metering is not enough and you have to add light to the subject with a reflector or a fill flash.
What is exposure lock and when is it used?
It is fixing the reading with the AE-L button so you can recompose without the exposure changing: you meter on the area that matters to you, lock and frame however you want. It is what makes spot metering usable in the field, because the point you want to meter is almost never where it will end up in the final composition.
What to meter before shooting
First decide which zone of the scene must be well exposed, meter there, and use the histogram to check whether the rest fits. That cycle (meter, compensate, verify) is developed in the histogram reading guide, which is what turns metering into a decision and not an act of faith.
The 44 Enfogram cards come with the metering modes and their compensations printed on them, so you can decide with the scene in front of you and your eye in the viewfinder.