Light Painting: Painting With Light Step by Step
Light painting step by step: gear, camera settings, orb, silhouette and light-writing techniques to create unique night photos.
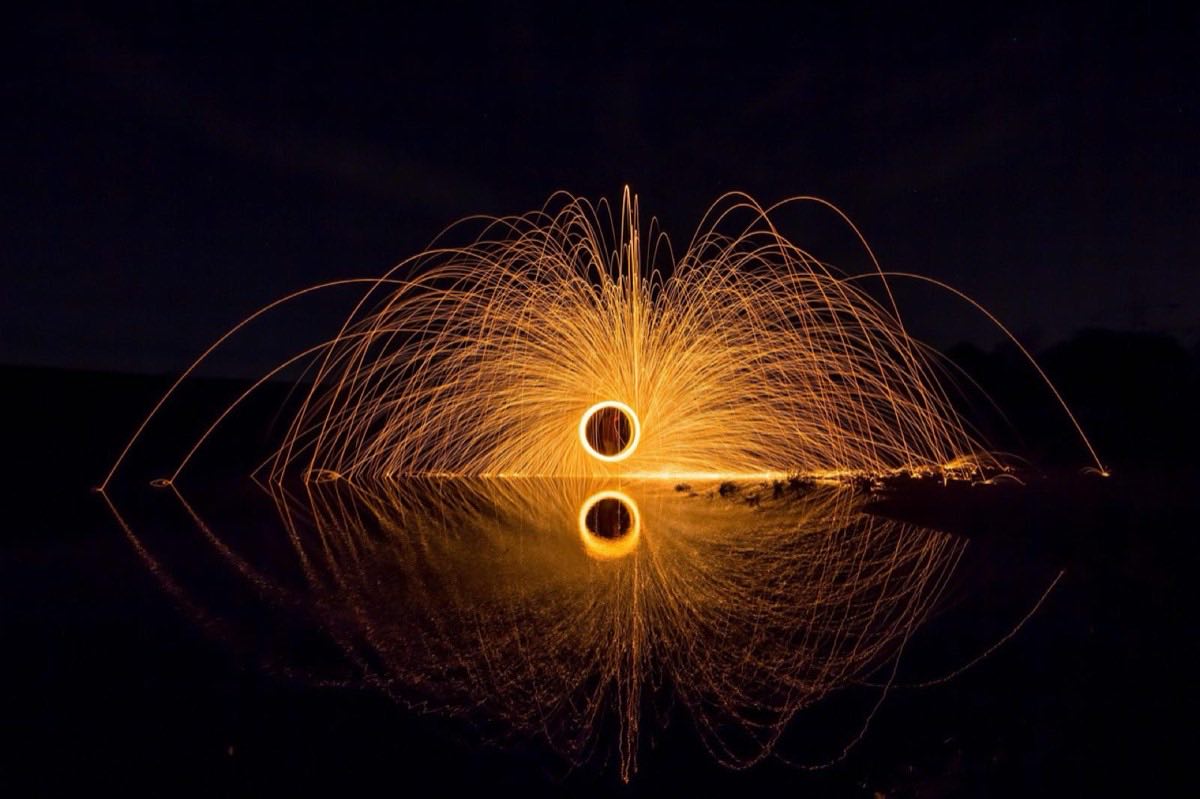
There is a photographic genre where the photo isn't taken: it's performed, like choreography. Light painting consists of opening the shutter for seconds or minutes in total darkness and drawing within the frame with moving light sources: flashlights, LED strips, colored lights, glowing steel. The camera accumulates everything that shines; you become invisible if you keep moving.
It's the perfect gateway to creative photography: the gear is minimal, the result is immediate and spectacular, and every shot is literally unrepeatable. It's also an unbeatable laboratory for understanding exposure, because you separate its variables in real time: the aperture controls the brightness of your strokes, and the time only defines how much you can draw.
Here is the complete technique, from the first letter drawn to the perfect orb. For the context of all experimental techniques, the guide to experimental techniques and creative photography expands the full map of the genre.
The principle: the open shutter is your canvas
All of light painting rests on three physical rules:
Moving light leaves a trail: any lit source that moves during the exposure draws a line.
Moving darkness disappears: if you dress in black and never stop moving, you don't appear in the photo even if you cross the frame ten times.
The brightness of the stroke depends on aperture and ISO, not on time: a flashlight that passes for an instant over each point deposits the same light no matter what happens afterward. The exposure time only defines the length of your canvas.
That last one is the operating key: if your strokes come out burned, stop down or lower the ISO; if they come out weak, open up or raise it. Don't touch the time for that.
What settings and gear do I need?
Base setup: manual or bulb mode, RAW, manual focus (light up the spot where the action will be, focus and lock), stabilization off, a firm tripod and a remote release.
Technique: Light writing; Aperture: f/8; Time: 10-30 s; ISO: 100; Light source: Small flashlight or LED finger
Technique: Orb (sphere of light); Aperture: f/8-f/11; Time: 30-60 s; ISO: 100; Light source: LED strip on a spinning cord
Technique: Lighting a landscape/building; Aperture: f/5.6; Time: 30 s; ISO: 200-400; Light source: Powerful flashlight in sweeps
Technique: Portrait with a light outline; Aperture: f/8; Time: 15-20 s; ISO: 100; Light source: LED tube or strip behind the subject
Technique: Steel wool (sparks); Aperture: f/8; Time: 15-30 s; ISO: 100; Light source: Burning steel wool, with maximum safety and permits
The starter kit fits in a pocket: a flashlight with zoom, cheap colored LED lights (bicycle lights work), string, and tape or color gels. Programmable pixel tubes come later, but you don't need them to learn.
How do I do writing, orbs and selective lighting?
Writing and drawing: point the light toward the camera and draw in the air. Remember that the camera sees your text mirrored: write backwards or flip the photo afterward. Keep a constant rhythm (pauses create bright dots) and turn the light off between strokes to "lift the pencil".
The orb: tie a short LED strip to a 50-80 cm cord. Plant your feet at a fixed point, swing the light like a circular pendulum in front of you and keep rotating your body on that axis between spins. Each circle is drawn on a different plane and the sum forms a sphere. The first five attempts will come out crooked; the sixth will get you hooked forever.
Selective scene lighting: the subtlest mode and the most useful for night landscape. With the shutter open, "paint" with a flashlight the elements you want to reveal: a tree, a rock, a facade. Soft sweeps, at an angle (never from the camera, which flattens), and in layers: 3 seconds here, 2 there. It's literally lighting a set without flashes, and it connects directly with the principles of direction and quality of light from studio lighting, only with the flashlight as a mobile softbox.
From trick to image: composition and scene
The universal mistake in light painting is staying with the floating scribble in a black void. Memorable images integrate the drawing into a place: an orb on an abandoned pier, writing over a classic car, a light outline around a still person in a tunnel.
Work the scene like a night landscape: arrive while there's still light, compose, and decide where each luminous element will live. First expose a base shot of the surroundings (30 s, f/8, ISO 400 with residual urban light) to verify the framing. If your scene has a starry sky, combine disciplines: the sky settings rule and the drawing adapts, as detailed in the practical guide to night photography with pinpoint stars.
For human subjects: the person must stay still as a statue throughout the exposure (15-20 s is the realistic limit) or be lit only for an instant with a burst of manual flash at the start, staying frozen while the rest of the drawing happens.
Frequently asked questions
Why don't I appear in the photo if I crossed the frame?
Because only what is bright enough and still enough gets recorded. Dressed in dark clothes and in constant motion, each point on the sensor sees you for a fraction of a second: too little to leave a mark.
What do I do if the background comes out too bright and kills the effect?
You have light pollution or too much exposure time. Stop down to f/11, drop to ISO 100 and reduce the total time; or look for a darker place. Light painting needs the ambient light to contribute almost nothing.
Can you do light painting at home?
Perfectly: a dark room, 10-20 seconds, f/8, ISO 100. It's the best training ground for orbs and writing before heading out to locations.
One photo or several stacked?
Both schools are valid. The single shot is the purist challenge; stacking several exposures (each with one element of the drawing) gives total control and is standard practice in complex work. Start with a single shot to master the technique.
Start with a flashlight and 15 seconds
Light painting turns long exposure into a performance: the technique is learned in one night and perfected over years. Start with a flashlight and 15 seconds, and increase the complexity only when the scribble has a scene, intention and composition.
Bring the base settings already worked out so you can devote all your energy to drawing. At Enfogram you'll find the 44 photography cards with the exact settings for every situation: print them, carry them with you and shoot with confidence.