Experimental Techniques and Creativity
Experimental photography breaks rules to create new forms of expression: master the fundamentals first, then break them with intent.
ICM lives between 1/8 s and 1/2 s; light painting, between 30 s and several minutes at f/8 and ISO 100. Outside those ranges there is no effect: there is a photo blurred without intent or a blown-out frame. The experimental technique that works is the one you write down and can repeat the following week.
Experimental photography breaks established rules to create new forms of visual expression. Techniques such as multiple exposures, light painting, infrared photography or deliberate optical effects expand creative possibilities beyond literal representation. Master the fundamentals first and break them afterward, on purpose.
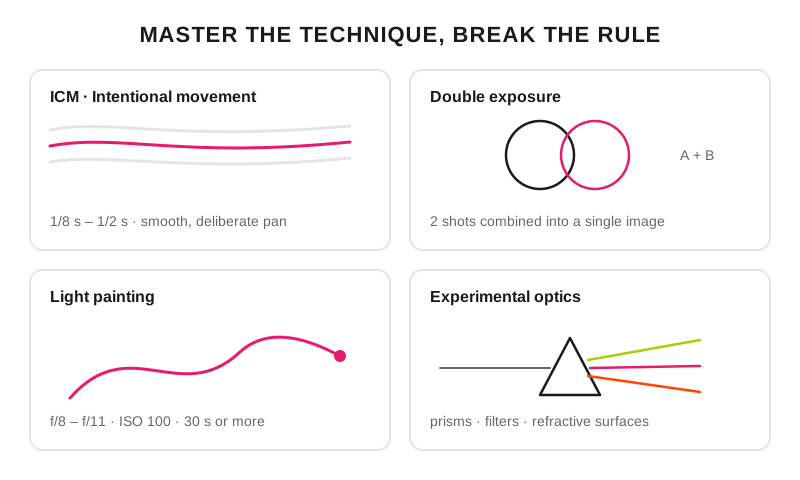
Four experimental techniques with the settings that make the effect repeatable.
When does an experiment stop being an accident?
Experimental techniques are not just visual games. They are a way of expanding your gaze and your creativity, a space of freedom to create new visual languages toward worlds that challenge the conventional.
The challenge is to do it with intent: each technique must serve a narrative, not stop at an empty effect. With practice, documentation and discipline, experimentation becomes a solid resource for building style.
What techniques are there and what are they for?
Multiple exposures: combining disparate elements in a single image.
Light painting: LED flashlight, long shutter speeds, controlled light patterns.
ICM (intentional camera movement): creative pans, color abstractions.
Projections: mapping light onto subjects, creating impossible environments.
What settings do I use for each technique?
Technique: Multiple exposures; Shutter speed: that of each layer, at −1 EV if the camera adds them; Aperture: f/5.6 – f/8; ISO: 100; Support: tripod if the layers must align; What ruins it: two equally bright layers: they cancel each other out
Technique: Light painting; Shutter speed: 30 s to several minutes, bulb mode; Aperture: f/8 – f/11; ISO: 100; Support: tripod and remote release; What ruins it: pointing the flashlight at the lens
Technique: ICM, intentional movement; Shutter speed: 1/8 s – 1/2 s; Aperture: f/16 – f/22, or ND if there is sun; ISO: 100; Support: handheld, continuous movement; What ruins it: jerks and changes of direction
Technique: Optical experiments; Shutter speed: whatever the scene calls for; Aperture: f/2.8 – f/5.6; ISO: depending on light; Support: free; What ruins it: the prism blocking the focus point
Two calculations worth having done before heading out. The first: in additive mode, each of two exposures goes one stop under, because the sum of both gives back the correct exposure. The second: an ICM at 1/8 s with ISO 100 works out at f/22 in overcast daylight (EV 12), but in full sun (EV 15) f/22 falls three stops short and you need a 3-stop ND (the ND filter calculator gives the exact density for the shutter speed you want).
The mistakes that leave the effect meaningless
Experimenting without a solid technical foundation (accidental, unrepeatable results).
Effects without a clear narrative or aesthetic purpose.
Not documenting successful settings for future replication.
Ignoring safety standards in techniques involving fire or chemicals.
Pro tips
Experimental approach: try a new technique every quarter.
Document all successful settings to build a technique library.
Combine traditional techniques with experimental ones for unique results.
Master the technique, break the rule, create your language.
Frequently asked questions
What settings do I use for light painting?
f/8 to f/11, ISO 100 and an exposure of 30 seconds to several minutes in bulb mode, with the camera on a tripod and a remote release. You supply the light by walking through the scene with a flashlight: the low ISO and mid aperture exist so that the flashlight, and not the ambient light, is what draws.
How do I do 1/8 s pans in full sun without blowing out the photo?
With an ND filter. At ISO 100 and f/22 the correct exposure in full sun is around 1/60 s, so to drop to 1/8 s you are three stops of density short; starting from f/11, where the exposure falls near 1/250 s, you need five. Stopping down beyond f/22 is not the way out, because diffraction takes away the little sharpness the pan leaves.
Can I do double exposures if my camera doesn't include them?
Yes, by compositing the layers afterward in editing with blend modes. The practical difference is that in camera you see the result and adjust on site, and in post you have total control over opacity and masks; to start, shoot the two frames already thinking about which will be the background and which the silhouette.
How do I repeat an experiment that came out well by chance?
By writing down shutter speed, aperture, ISO, distance and the exact gesture (direction and path of the movement, position of the flashlight) at the moment, not at home. The metadata keeps the first three, and those are precisely the ones you need least: what can't be recovered later is the gesture.
What to try on your next outing
Choose a single technique and make ten variations of it, changing one parameter at a time, instead of ten techniques with one shot each. The shutter speed ranges all of this depends on are tabulated in the shutter speeds guide, and the step-by-step of the flashlight, in light painting step by step.
The 44 Enfogram cards come with these ranges printed, so you can consult them at night with your hands full.