Studio Lighting Concepts
Studio lighting is architecture with light: each source has a function and its quality depends on the relative size of the source.
Start with a single light 45° to one side and 45° up, at quarter power, and a reflector opposite. That is a Rembrandt and it solves most portraits; everything else is variations on that position. The quality of light depends on the size of the source relative to the subject: a 90 cm octabox one meter from the face gives soft-edged shadows, and the same gear at four meters gives hard light.
Studio lighting is architecture with light: you build the environment you need from scratch. Each light has a specific function: main (key), fill, separation (rim), background.
Which lighting pattern do I use for each portrait?
Rembrandt: main light 45° to one side of the subject and 45° up, producing a triangle of light on the cheek on the side of the face opposite the light source. It is a classic.
Butterfly: frontal, raised light at 45° or more of elevation over the subject's face, to create a small, symmetrical butterfly-shaped shadow under the nose.
Clamshell: two frontal lights, one above and one below. It is like a Butterfly with a mirrored light low on the subject.
Split: side light that divides the subject's face into light and shade.
Cross lighting: two crossed lights. One in front, partly from the side, and one behind forming a diagonal.
Broad: light source placed 45° to one side and 45° up (like a Rembrandt) but with the face partially turned and with the lit side toward the camera.
Backlight: light behind the subject, facing the camera. The subject themselves blocks the light source so that only their outline around the edge is seen.
Short: light source placed 45° to one side and 45° up (like a Rembrandt) but with the face partially turned and with the shadowed side toward the camera.
Pattern: Rembrandt; Where the main light goes: 45° lateral, 45° up; What it marks on the face: Triangle of light on the opposite cheek; For whom: General portrait; works on almost any face
Pattern: Butterfly; Where the main light goes: Frontal, 45° or more elevation; What it marks on the face: Symmetrical shadow under the nose; For whom: Beauty; prominent cheekbones
Pattern: Clamshell; Where the main light goes: Butterfly + second low frontal source; What it marks on the face: Filled shadows, even skin; For whom: Clean portrait, cosmetics advertising
Pattern: Split; Where the main light goes: Pure lateral; What it marks on the face: Half the face in light, half in shade; For whom: Dramatic portrait, skin texture
Pattern: Broad; Where the main light goes: 45°/45° with the lit side toward the camera; What it marks on the face: Widens the face; For whom: Very narrow faces
Pattern: Short; Where the main light goes: 45°/45° with the shadowed side toward the camera; What it marks on the face: Narrows the face; For whom: Wide faces; the most used in portraiture
Pattern: Backlight; Where the main light goes: Behind the subject, toward the camera; What it marks on the face: Only the outline; For whom: Silhouettes and separation from the background
The full list of names and their variants is in the entry for lighting patterns, and the three basic ones applied with a single source in Rembrandt, butterfly and side light.
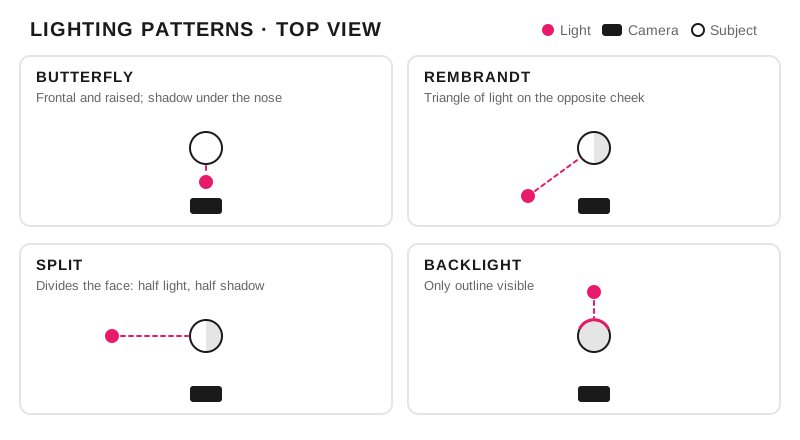
Position of the main light in four classic patterns, seen from above.
How do I set up each type of session?
Basic setup: main light at 45° + fill reflector opposite.
Dramatic portrait: side main light + black background + hair light.
High key: multiple sources, even lighting, overexposed white background.
Low key: controlled main light, lighting only details, deep shadows, dark background.
What power and ratio do I start with?
Power: start with the main light at 1/4, adjust from there.
Ratio: main light 2:1 or 3:1 relative to the fill. A 2:1 is one stop of difference between the lit side and the shadow side; a 3:1, a little over a stop and a half.
Modifiers: softbox for softness, beauty dish for portraits, umbrella for broad diffuse light.
Metering: external flash meter for absolute precision. Without one, the guide number gives you the starting aperture at the distance where you have placed the light.
Why does my studio portrait look flat?
Main light too frontal (eliminates dimension).
Multiple shadows from confusing lighting.
Backgrounds with unwanted shadows for lack of separation between subject and background.
Not controlling the spill of light onto unwanted areas.
Professional tips
Favorite portrait setup: 90 cm octagonal softbox at 45°, silver fill reflector.
Use continuous light to learn patterns before moving to studio flash.
For products, eliminate hard shadows with several soft sources and a light tent; the complete setup is in the product and commercial photography guide.
Frequently asked questions
How many lights do I need to start in the studio?
One, plus a reflector. A single source at 45° to one side and 45° up with a white reflector opposite solves a complete portrait, and learning to move that single light teaches more than having four on at once. The second light worth adding is the separation light between subject and background, not the fill.
How do I make the light softer without buying anything?
Bring the source closer to the subject. Softness depends on the size of the source relative to the subject, so the same softbox at one meter is much softer than at three. If you cannot bring it closer, bounce the light off a white wall or ceiling: you turn the whole wall into the source.
Why do several shadows appear on the background wall?
Because there is more than one source lighting the subject from different angles and none clearly dominates. Turn off all but the main one, place that shadow where you want it, and bring up the rest only until they fill without drawing a shadow of their own. Separating the subject a couple of meters from the background also makes their shadows stop falling on it.
Continuous light or studio flash?
Continuous light for learning, because you see the result before shooting and the pattern is understood with your eyes. Studio flash for working: it gives more power, freezes the subject's movement and does not heat up the set. The transition between one and the other is in the flash lighting guide.
Lighting is sculpting with shadows.
The 44 cards from Enfogram have the studio patterns printed with their angles, so you can set up the light without looking up the name on your phone.