The Exposure Triangle, Step by Step
The exposure triangle is the basis of light control: ISO, aperture and shutter speed work together as a balancing system.

Five stops you close the aperture are five stops you open the shutter speed: ISO 800 with f/2.8 and 1/1000 s gives exactly the same light as ISO 800 with f/16 and 1/30 s. The photo changes (in the second there is much more depth of field and anything that moves comes out smeared), but the exposure is identical. That trade-off is the whole triangle.
The exposure triangle is the basis of light control in all photography: sensor sensitivity or ISO, aperture and shutter speed work together as a balancing system. If you change one, you must compensate with another to keep the same exposure.
It is like a three-armed scale: when one goes down, another must go up.
If we move one of the settings of the exposure triangle, we have to move another setting the same number of stops in the opposite direction to keep the same exposure.
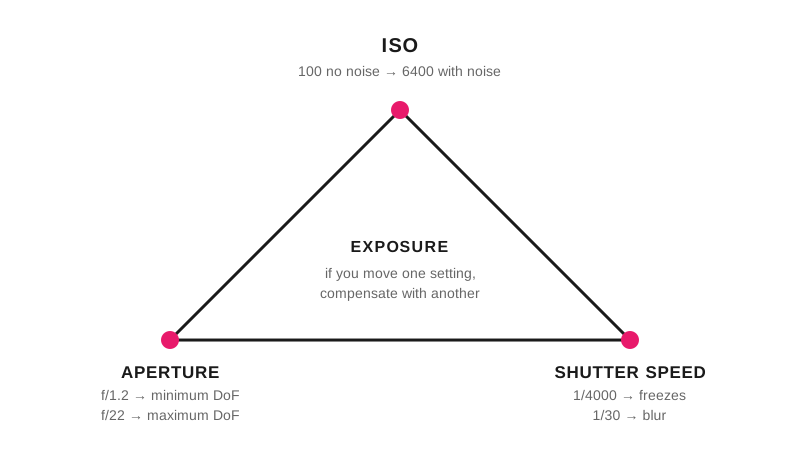
The exposure triangle: when you move one of the three settings, compensate with another to keep the same light.
What does each side of the triangle control?
Aperture (f/1.2 – f/22): smaller aperture, greater depth of field; larger aperture, shallower depth of field.
Shutter speed (1/4000 – 1/30): fast speed freezes motion; slow speed brings blur into the photo.
Sensor sensitivity / ISO (100 – 6400): lower sensitivity to light, the image has little noise; higher sensitivity to light, the image shows noise.
All three move the same quantity (the amount of light that reaches the file) and each charges a different price for doing so. The exposure triangle simulator lets you see the trade-off by moving the three controls over a scene.
How do I compensate one setting with another?
Starting setup: ISO 800. Aperture f/2.8. Shutter speed 1/1000.; Situation: I want to increase the depth of field.; Settings needed: ISO 800 (unchanged). f/16 (5 stops less light). 1/30 (5 stops more light).; Result: Same exposure with more areas in focus across the whole scene.
Count the stops on the scale, not in the numbers: from f/2.8 to f/16 there are five steps (f/4, f/5.6, f/8, f/11, f/16) and from 1/1000 to 1/30 there are another five (1/500, 1/250, 1/125, 1/60, 1/30). Five up and five down leave the scale where it was. The equivalent exposures calculator does the math when the trade-off splits stops between two settings at once.
What settings do I use in each situation?
Beginners: start with a fixed ISO and experiment with aperture and shutter speed.
Sports: choose fast shutter speeds (1/500+), adjust the other 2 variables according to ambient light.
Portraits: wide apertures (f/1.8–f/2.8), to make the subject stand out from the background, adjust the other 2 variables according to ambient light.
Landscapes: f/8–f/11 as a base, ISO 100 or 200, choose the shutter speed according to ambient light.
With the three numbers set and the light measured, that advice becomes concrete settings:
Situation: Outdoor sports, direct sun; Light (EV at ISO 100): 15; ISO: 100; Aperture: f/8; Shutter speed: 1/500 s; Who's in charge: The shutter speed
Situation: Sports on an indoor court; Light (EV at ISO 100): 8; ISO: 3200; Aperture: f/4; Shutter speed: 1/500 s; Who's in charge: The shutter speed; the ISO pays the difference
Situation: Portrait in open shade; Light (EV at ISO 100): 12; ISO: 100; Aperture: f/1.8; Shutter speed: 1/1250 s; Who's in charge: The aperture
Situation: Landscape in full sun; Light (EV at ISO 100): 15; ISO: 100; Aperture: f/11; Shutter speed: 1/250 s; Who's in charge: The aperture, with ISO at minimum
Situation: Portrait by a window; Light (EV at ISO 100): 9; ISO: 400; Aperture: f/5.6; Shutter speed: 1/60 s; Who's in charge: The ISO, because there is no margin left
The two sports rows are the same shutter speed with seven stops of difference in light: direct sun measures EV 15 (f/16 and 1/125 s at ISO 100, the sunny 16 rule) and an indoor court measures around EV 8. Those seven stops come from opening from f/8 to f/4 (two stops) and raising from ISO 100 to ISO 3200 (five stops). There is no more magic than that subtraction.
Common mistakes
Raising ISO unnecessarily.
Using very small apertures (f/16–f/22), since diffraction can reduce sharpness.
Not understanding that every change affects the result of the image.
Changing all three parameters at once without criteria.
Pro tips
Mantra: use ISO as a last resort, aperture for creativity, shutter speed to freeze or blur moving objects.
In changing conditions, use aperture priority (exposure mode) and adjust shutter speed and ISO.
Memorize the equivalents: f/2.8 + 1/250 is equivalent to f/4 + 1/125 and equivalent to f/5.6 + 1/60.
Frequently asked questions
Which of the three settings do I start with?
With the one that defines the photo you want. If the subject moves, set the shutter speed first; if what you are deciding is how much background comes out blurred, set the aperture first; ISO is touched last and only when the previous two have no more to give. That order avoids the most common mistake, which is raising the ISO before having spent the margin left in the aperture.
What exactly is a stop?
A stop is doubling or halving the light that reaches the sensor. In shutter speed it is direct: from 1/125 s to 1/250 s is one stop. In aperture the scale jumps by the square root of two each time (f/1.4, f/2, f/2.8, f/4, f/5.6, f/8, f/11, f/16, f/22) and each step is also one stop. In ISO, from 100 to 200 is one stop, and from 100 to 3200 is five.
Why is my photo well exposed but comes out blurred?
Because exposure and sharpness are different problems. The camera can give you a correct exposure at 1/15 s, and at that speed neither your hands nor a walking subject can hold up. Raise the shutter speed to the minimum the scene needs and give that light back by opening the aperture or raising the ISO: a grainy photo is preferable to a blurry one, because grain can be reduced and motion cannot.
Is it wrong to use auto ISO?
No, if you set limits. Configure a minimum shutter speed in line with what you photograph (1/250 s for people walking, 1/500 s for sports) and an ISO ceiling you accept seeing in the image; with those two limits, auto ISO handles light variations much faster than you can. Without limits, the camera will choose 1/60 s and hand you perfectly exposed blurry faces.
Why doesn't f/22 give me more sharpness than f/11?
Because beyond a certain point diffraction blurs the whole image more than the added depth of field improves it. In practice, f/8–f/11 is the range where most lenses perform best, and f/22 is reserved for when you need to lengthen the exposure or reduce the light, not to gain detail.
The order in which you touch the three settings
First you decide what the scene demands (freezing or opening up), then you look at how much light there is, and only then do you raise the ISO by the difference that is missing. If you want to correct the result without breaking that balance, exposure compensation moves the whole exposure in stops without making you recalculate anything.
The 44 Enfogram cards come with these stop equivalences printed, so you can solve the trade-off without doing the math in your head.