ISO Sensitivity: How and When to Raise It
What ISO really does, how high to push it on your camera and which setting to adjust before it, with values by scenario.

ISO is one of the three pillars of the exposure triangle, along with aperture and shutter speed. Its function is to set how much the signal the sensor has already captured is amplified, and with that it determines the final image quality: the higher the ISO, the more likely digital noise is to appear.
Mastering ISO means knowing when to raise it and how far. Keeping it low when there is enough light ensures maximum quality, but raising it in difficult conditions can be the difference between capturing a sharp moment or losing it to a blurred photo.
What is ISO and how does it work?
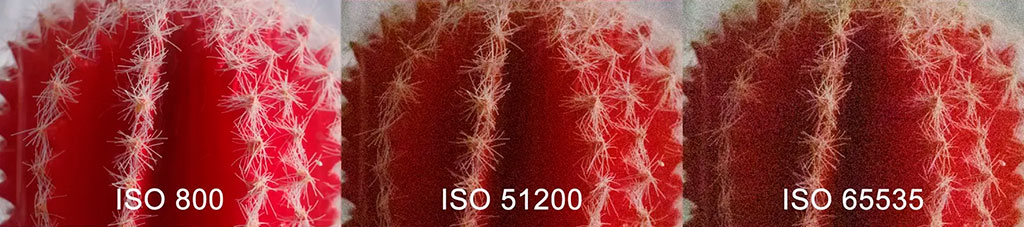
The term ISO comes from the system for measuring sensitivity to light defined by the International Organization for Standardization. In digital photography, raising the ISO does not make the sensor physically more sensitive, but amplifies the captured electrical signal. That amplification is what introduces noise: small random variations in the signal that appear as graininess in the image.
The relationship between ISO and quality is not linear. The difference between ISO 100 and ISO 400 can be imperceptible on most current cameras. The difference between ISO 1600 and ISO 6400, on the other hand, can be very noticeable depending on the sensor size and the camera's generation.
When is it worth raising the ISO?
Keep the ISO as low as possible (100-200) outdoors in sun or when light is abundant.
Raise ISO only if sharpness is at risk from a shutter speed that is too slow.
Use high ISO intentionally when you want a grainy aesthetic, as in street or documentary photography.
ISO is not the enemy of quality. The grain of ISO 3200 can give character to a night scene in the same way film grain added texture to analog photos.
Which ISO do I use in each scenario?
Scenario: Sunny outdoors; ISO: 100; Why: Maximum quality and dynamic range
Scenario: Indoors with a window; ISO: 400-800; Why: Balance between naturalness and detail
Scenario: Concerts or theater; ISO: 1600-3200; Why: Freeze action in low light
Scenario: Street at night; ISO: 3200-6400 (if the camera tolerates it); Why: Some noise in exchange for atmosphere
Scenario: Sports in an indoor stadium; ISO: 1600-3200; Why: With a minimum shutter speed of 1/500s
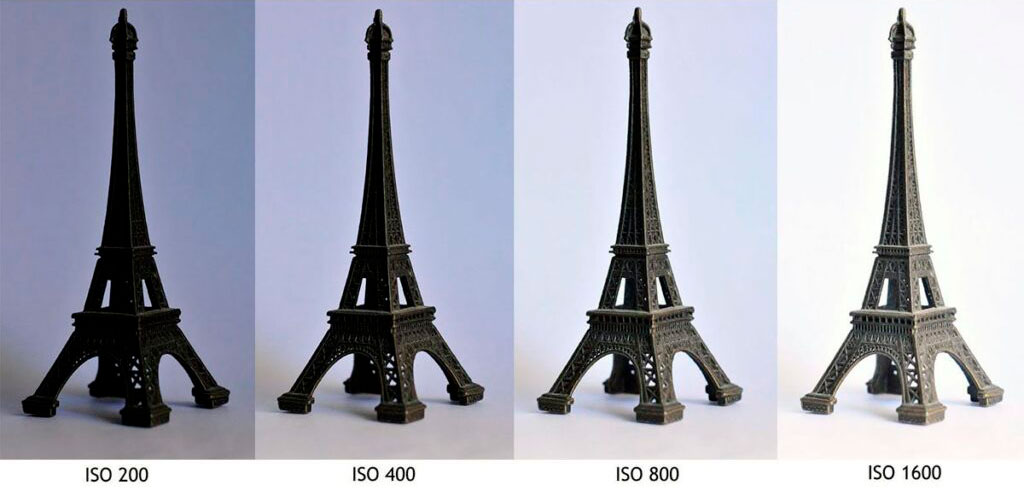
These values are starting points. Every camera has a personal limit of acceptable noise, and knowing it is part of technical mastery. The recommended approach is to run an ISO test specific to your gear: photograph the same scene at ISO 100, 400, 800, 1600, 3200 and 6400, then zoom to 100% on screen and determine the acceptable limit for your standards.
The three mistakes that cost a lot
The most common mistake is leaving ISO on automatic with no control, which can produce photos at ISO 6400 in situations where adjusting aperture or shutter speed was enough. Auto ISO is useful, but it must be set with a maximum limit to avoid surprises.
Another extreme is the obsession with keeping ISO low, sacrificing sharpness to camera shake. A photo with some noise but perfectly sharp is better than a "clean" photo that is blurred by insufficient shutter speed.
It is also a mistake to raise ISO to the maximum without first optimizing aperture and shutter speed. Priority should always follow a logical order: first define the creative aperture, then set the shutter speed to the safe minimum and only then raise the ISO to the necessary level.
ISO always moves together with the other two parameters of the exposure triangle, and the guide to smart ISO goes through that relationship case by case.
Professional tips for conscious ISO control
A practical formula for deciding is this:
Define the lens aperture creatively (desired depth of field).
Set the safe minimum shutter speed according to focal length and situation (for example: 1/125s in portraits, faster speeds in action shots).
Only then raise the ISO needed to achieve the correct exposure.
Use the histogram as an ally: if you see clogged shadows or blown highlights, check whether the current ISO compromises quality. And remember: every camera has an acceptable noise limit. Learn it by testing in your own scenarios.
Auto ISO with a limit handles situations where the light changes from one shot to the next. Setting auto ISO with a ceiling at 3200 and a minimum shutter speed of 1/125s lets you react quickly without losing full control of the exposure.
Which ISO do I use for astrophotography?
In night photography, ISO takes on a special dimension. For astrophotography, you usually work with ISO 1600 to 3200, exposures of 15 to 25 seconds and wide apertures. In this case, noise is unavoidable and is handled with reduction techniques in post-processing or by stacking multiple exposures.
Night photography and astrophotography has its own rules for ISO, shutter speed and aperture, and they are what decide whether the stars come out as points or turned into trails.
Frequently asked questions about ISO sensitivity
Should I always avoid high ISO?
No. High ISO is useful and, on many current cameras, perfectly usable up to 3200 or even 6400. Raise it when sharpness is at risk and only as far as needed.
Does digital noise always ruin the photo?
Not necessarily. Sometimes grain adds character and texture, especially in documentary, street or night photography. The "ugly" noise is the kind that appears in uniform areas like skies or skin; grain in textures is usually less noticeable.
Is auto ISO bad practice?
No, but it is worth setting it with a maximum limit and a minimum shutter speed to avoid surprises. Without limits, the camera may select very high ISO values in situations that do not require it.
How do I reduce noise in post-processing?
Lightroom, Capture One and DxO PhotoLab offer effective noise reduction tools. Do not overdo it: aggressive reduction removes detail and leaves the image looking plastic. Shooting RAW makes this process easier by preserving more information.
The order is aperture, shutter speed, ISO
Define the aperture by the depth of field you want, lower the shutter speed to the safe minimum and only then raise the ISO until the exposure is right. In that order, you will almost never end up at 6400 without realizing it.
The only thing missing is your number: photograph the same scene at 100, 400, 800, 1600, 3200 and 6400, zoom to 100% and note where you stop liking it. That is the ceiling you should set in your camera's auto ISO.
The 44 cards from Enfogram have these ISO ranges printed by scenario, so you can check them the moment the light fades.