Smart ISO: Choosing the Right ISO
ISO adapts the camera to the available light while keeping your creative priorities: use the ideal ISO for each situation, not always the lowest.
ISO 100 in full sun, ISO 400 in deep shade, ISO 1600 indoors in low light and ISO 3200–6400 at night. That is the complete map, and the table below crosses it with the aperture and shutter speed that come out at each light.
ISO adapts the camera to the available light without touching your creative priorities. Grain is not always bad: sometimes it adds texture and character. What matters is using the ISO that solves the scene, not the lowest possible one.
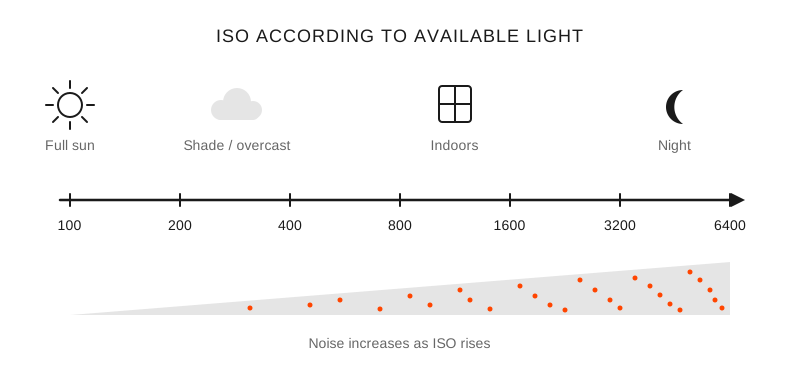
The less light available, the higher the ISO needed, and with it, more noise in the image.
What ISO do I use depending on the light?
Scene light: Full sun, no shadows; ISO: 100; Starting pair: f/16 · 1/125 s; Approx. EV: 15
Scene light: Shade or overcast day; ISO: 200; Starting pair: f/5.6 · 1/500 s; Approx. EV: 13
Scene light: Deep shade or very overcast day; ISO: 400; Starting pair: f/5.6 · 1/250 s; Approx. EV: 11
Scene light: Sunrise or sunset; ISO: 640–800; Starting pair: f/4 · 1/250 s; Approx. EV: 9
Scene light: Bright interiors; ISO: 800; Starting pair: f/2.8 · 1/125 s; Approx. EV: 7
Scene light: Medium-level indoor lighting; ISO: 1000; Starting pair: f/2.8 · 1/100 s; Approx. EV: 6
Scene light: Low-light interiors; ISO: 1250–1600; Starting pair: f/2 · 1/125 s; Approx. EV: 5
Scene light: Extremely low light; ISO: 3200–6400; Starting pair: f/2 · 1/60 s; Approx. EV: 2–3
The pair in each row is a starting point at that light, not the only answer: if you need more depth of field, stop down the aperture and give that light back with shutter speed or ISO. Each ISO step doubles sensitivity, so going from 800 to 1600 buys you exactly one stop: 1/125 s instead of 1/60 s, or f/2.8 instead of f/2. The full equivalences are in the equivalent exposures calculator, and how the tradeoff is divided among the three controls is in the exposure triangle guide.
These ISO applications are for ambient (continuous) light, not for electronic flash. The noise factor of the ISO setting can vary widely depending on the camera model.
How much noise does raising the ISO add?
Comparison of the same scene at ISO 400, ISO 3200, ISO 102400 and ISO 204800: the higher the ISO, the more digital noise the image shows. The jump is neither linear nor the same on all cameras, and that is why the only limit that helps is the one you measure yourself with yours.
What ISO do I use in each scene?
Sunny day: ISO 100–200, maximum quality and dynamic range.
Indoors with daytime windows: ISO 400–800 to take advantage of the window light.
Blue hour: ISO 800–1600, captures the atmosphere without a tripod.
Night events: ISO 1600–6400, prioritize the moment over technical perfection.
What limit do I set on auto ISO?
Beginners: auto ISO with a maximum limit of 1600.
Studio portraits: fixed ISO 100 with controlled lighting.
Street photography: ISO 400–800, ideal compromise for variability.
Astrophotography: ISO 3200–6400 depending on the camera's capabilities, with the shutter speed given by the 500 rule or NPF for your focal length.
Common mistakes
Irrational fear of noise (losing moments to keep the ISO low).
Not knowing the real limits of your specific camera; how to measure them is in how high to take the ISO.
Using auto ISO without limits in controlled situations.
Judging noise on the camera's small screen.
Pro tips
Test your camera: shoot the same scene at all available ISOs.
Accept some noise instead of losing sharpness to a slow shutter speed: noise is corrected in development and motion isn't. The rest of the tradeoff is in the low-light photography guide.
For professional work, set limits according to the medium where it will be published (web vs print).
Frequently asked questions
How high can I raise the ISO without ruining the photo?
It depends on the model and the final size of the image, so the useful answer comes from your own camera: shoot the same scene at all available ISOs, look at them at 100% on a large screen and print two or three. Almost any recent camera gives publishable files at ISO 3200; the noise you see at 100% on screen stops being visible in a 20 cm print.
Does raising the ISO reduce dynamic range?
Yes: on many cameras, each ISO step you go up cuts roughly one stop of the available dynamic range, because the margin left above the mid-tone shrinks. In practice it means that at ISO 6400 you have less margin to recover a blown sky than at ISO 400, which is why it pays to expose more carefully the higher you shoot.
Is it better to raise the ISO or underexpose and lift in development?
Raise the ISO, on most cameras and up to the middle of the scale: amplification is applied before converting the signal and produces less noise than multiplying a dark file on the computer. The exception is cameras with dual ISO, where from the second native step it pays to meter again. In any case, underexposing two stops to "save" ISO almost never pays off.
What limit do I set on auto ISO?
1600 while you are learning, because it forces you to decide between aperture and shutter speed instead of letting the camera cover everything with sensitivity. Once you know how your camera looks at each value, raise the cap to 3200 or 6400 for reportage and events, where losing the moment costs more than grain. Also set a minimum shutter speed if your camera allows it: it is what keeps auto from choosing 1/15 s.
The 44 cards from Enfogram have this ISO-by-light table printed on them, so you can choose without taking out your phone or leaving the viewfinder.