360° Photography and Virtual Reality
360° photography and virtual reality create immersive experiences that require specific capture techniques and specialized software.
Rotate the camera around the lens's no-parallax point and deliver at 4K or more: those two decisions determine whether the stitch shows. When the camera rotates around the tripod screw instead of around the entrance pupil, nearby objects shift between shots, and no software joins that shift without leaving a trace.
360° photography and Virtual Reality (VR) create immersive experiences that completely surround the viewer. They require specific capture techniques, specialized software to professionally stitch images together into a three-dimensional environment and careful consideration of narrative flow in interactive experiences.
The quality of the stitching between images and the final resolution determine the credibility of the immersive experience.
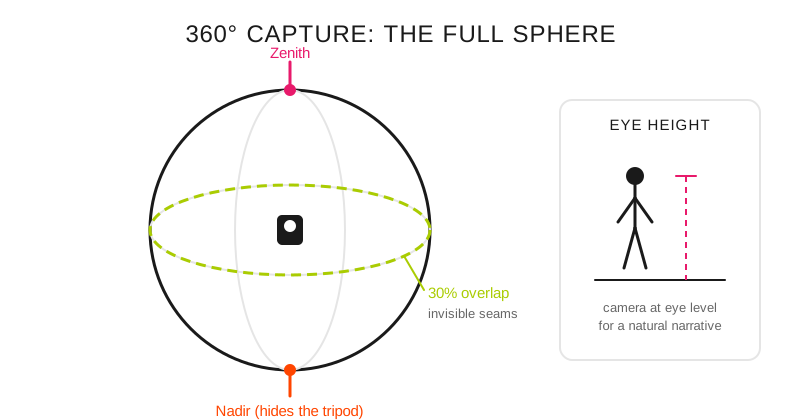
The camera captures a full sphere: watch the overlap between shots, hide the nadir and place it at eye height.
What makes an immersive experience credible?
360° photography and virtual reality (VR) represent a new frontier in visual storytelling: they let you immerse the viewer in a space. As a requirement, the technique must support the narrative intent.
Mastering it is not a matter of fashion, but of methodology and care with details. A walkthrough with invisible seams, even lighting and smooth navigation documents a space and turns it into an experience.
What is 360° photography used for?
Use: Real estate tour; Capture points: one per room plus one linking point in hallways; Camera height: at eye level, 1.50 – 1.65 m; Output: 4K or more per panorama; What ruins it: blown-out windows and confusing navigation
Use: Heritage documentation; Capture points: systematic grid with noted positions; Camera height: constant and recorded on all shots; Output: the maximum available; What ruins it: the light changing midway through the walkthrough
Use: Showroom or product presentation; Capture points: the points from which the product is viewed; Camera height: eye level; Output: 4K or more; What ruins it: spot lights that create hotspots
Use: Gallery or art installation; Capture points: center axis of the room and in front of each work; Camera height: eye level; Output: the maximum available; What ruins it: your reflection in display cases and glass
An interior with windows is the hard case: the range between the wall in shadow and the sky exceeds what a single exposure records, so each panorama is shot with bracketing and merged with the techniques in the guide to HDR and exposure blending. The naming and versioning order of each capture point matters more than in any other genre (a tour is dozens of files per room) and that system is in the file management guide.
What gear and what settings do I need?
Specialized equipment: a dedicated 360° camera or a multi-camera rig.
Positioning: at the eye height of an average person, strategic points for the narrative.
Lighting: even across 360°, avoid spot sources that create hotspots.
Post-processing: specialized software, parallax correction, output in 4K or higher resolutions.
The mistakes that break immersion
Visible seams in critical areas of the experience.
Including the photographer or equipment in the capture without planning.
Insufficient resolution for a convincing immersive experience.
Not planning intuitive navigation points between scenes.
Pro tips
Invisibility technique: use a discreet tripod and edit out your reflection in post.
Plan the entire experience before capturing: narrative flow and points of interest.
Always capture at the maximum resolution available (downsampling later keeps quality).
Immersion is not an effect: it is method, narrative and precision.
Frequently asked questions
Do I need a dedicated 360° camera?
Not to start: a DSLR or mirrorless with a wide angle on a panoramic head produces better quality than almost any consumer 360° camera, in exchange for shooting between 6 and 12 shots per point and stitching them afterward. The dedicated camera wins on speed and in scenes with movement, where the time between shots is exactly what breaks the stitch.
Why do the seams show?
Because of parallax: if the rotation axis does not coincide with the lens's entrance pupil, nearby elements change relative position from one shot to the next, and no alignment is possible between two different geometries. It is corrected by adjusting the panoramic head to the lens's no-parallax point and, indoors, by avoiding placing the tripod less than a meter from a piece of furniture.
How do I keep the tripod out of the image?
With a nadir patch: you shoot an extra shot of the floor with the tripod moved aside and use it to cover the lower area when assembling the sphere. A thin, single-column tripod leaves much less to cover than one with wide legs.
Is 4K enough for a virtual tour?
It is the minimum, and it is worth understanding why it looks soft: a 4096 px equirectangular sphere spread over 360° gives about 11 pixels per degree, so in a viewer with a 100° field of view you are looking at close to 1,000 pixels of width. At 8K that density doubles, and that is where the text on a sign inside the scene starts to become readable.
What to check before assembling the tour
That the camera height is the same at every point, that no panorama has an object less than a meter from the rotation axis and that the exposure does not jump between adjoining rooms. The stitching of flat panoramas follows the same rules and is detailed in panoramas without stitching errors and in the guide to panoramas and architectural photography.
The 44 cards from Enfogram come with the capture settings printed on them, so you can check them with the tripod set up and without going back to the computer.