HDR Techniques and Exposure Blending
HDR isn't a filter: it's a technique for capturing the full range of highlights and shadows your eye sees but your camera can't record at once.
Three shots 2 EV apart (−2, 0, +2) cover 4 stops of range; five shots 2 EV apart cover 8. That is the whole decision: look at the scene, work out how many stops separate the brightest light you want to keep from the darkest shadow, and bracket that range. With 3 stops of difference or less you don't need HDR, you need to process a single RAW well.
HDR (High Dynamic Range) is not an "Instagram filter," it is a technique for capturing the full range of highlights and shadows your eye sees but your camera can't record in a single exposure.
Keep it natural: the result should look like your memory of the place, not like an artificial image. There are manual and automatic options for blending the exposures; you decide which gives you the best result.
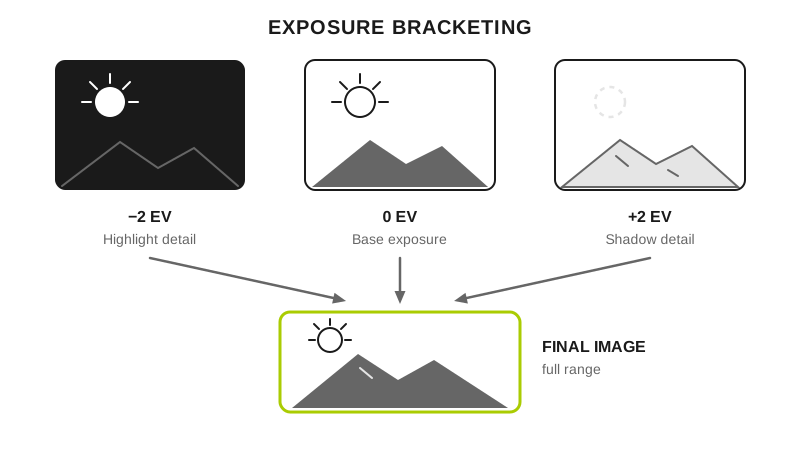
Three bracketed exposures are merged into a single image with detail in highlights and shadows.
What is photographic HDR for?
Photographic HDR extends what the camera records and brings the file closer to what your eye saw on the spot. It is about capturing detail in extreme highlights and shadows and blending them subtly without the viewer thinking about the technique. The limit you're getting around is the sensor's dynamic range: the distance, measured in stops, between the brightest light that doesn't blow out and the lowest shadow that still holds information.
How many exposures does each scene need?
Interiors with windows: 3 exposures (−2, 0, +2 EV) for perfect balance.
Landscapes at sunrise: 5 exposures for smooth sky gradations.
Backlit architecture: wide bracket (5 or more shots) for detail in shadows and sky.
Complex portraits: 2 exposures (face + background) blended manually.
Translated into concrete shutter speeds, with aperture and ISO fixed in each row and only the shutter moving:
Scene: Interior with window; Shots: 3; Step: 2 EV; Total range: 4 EV; Base: ISO 400, f/8, 1/15 s; Full series: 1/60 · 1/15 · 1/4 s
Scene: Landscape at sunrise; Shots: 5; Step: 1 EV; Total range: 4 EV; Base: ISO 100, f/11, 1/8 s; Full series: 1/30 · 1/15 · 1/8 · 1/4 · 1/2 s
Scene: Backlit architecture; Shots: 5; Step: 2 EV; Total range: 8 EV; Base: ISO 100, f/11, 1/250 s; Full series: 1/4000 · 1/1000 · 1/250 · 1/60 · 1/15 s
Scene: Backlit portrait; Shots: 2; Step: 2 EV; Total range: 2 EV; Base: ISO 200, f/2.8, 1/500 s; Full series: 1/2000 (background) · 1/500 s (face)
The architecture row starts from EV 15, which is the check against the sunny 16 rule at ISO 100: f/11 and 1/250 s are equivalent to f/16 and 1/125 s. If your base doesn't fit the rule, check it before shooting the entire series. The equivalent exposure calculator does the conversion when you prefer to bracket from another aperture.
The cost of each row is time. The five-shot sunrise series takes almost a second to complete, and in that second the branches move, the water advances and the clouds travel.
What settings do I use for bracketing?
Tripod strongly recommended: perfect alignment between exposures.
Manual mode: change only shutter speed, keep aperture and ISO constant.
Auto bracket: 3–5 exposures 1–2 stops apart.
RAW format: maximum information for later processing.
Keeping the aperture fixed is not a whim: if the camera moves it between shots, the depth of field changes and the edges don't align. That's why bracketing is always done by shutter speed.
Common mistakes
Artificial look with obvious halos.
Movement between exposures (wind, people, water).
Insufficient range: not capturing the tonal extremes needed.
Oversaturation in the final processing.
The third is detected on the spot: check the histogram of the darkest shot and that of the lightest. If the dark one still has clipped highlights or the light one still has shadows stuck to the left edge, widen the bracketing. The guide to exposure in complex landscapes develops that reading scene by scene.
Professional tips
Preferred technique: correct base exposure + underexposed for sky + overexposed for shadows.
Use luminosity masks for natural blending without HDR software.
For moving elements, prioritize one base exposure and adjust locally.
Frequently asked questions
How many exposures do I need for a backlit scene?
Count the stops: meter with spot metering on the brightest area you want to keep and on the darkest shadow, and subtract. If the difference is 4 stops, three shots 2 EV apart are enough; if it's 8, you need five shots 2 EV apart. With the sun inside the frame the difference exceeds 10 stops and no reasonable series covers it all, so you have to decide what blows out.
Can you do HDR with a single RAW file?
You can lift shadows and lower highlights from a single RAW, and for differences of up to 3 or 4 stops it is usually enough and avoids all the alignment problems. The real limit depends on the sensor and nobody publishes a reliable table: the sign you've overdone it is color noise in the lifted shadows and banding in the sky gradients. When they appear, bracket.
Why does my HDR have halos around the edges?
Halos come from pushing local contrast (clarity, "tone mapping," structure) around edges with a big difference in brightness, typically the outline of a mountain against the sky. Lower the local contrast and recover the effect with global contrast or curves. Luminosity masks solve the same case without creating a halo because the transition follows the image's own tone.
Can I bracket handheld, without a tripod?
In burst mode and at shutter speeds above 1/250 s, the blending software can usually align three shots without problems. Below that speed the displacement between shots grows and fine edges (branches, cables, text) come out doubled. With five shots and 2 EV steps the slowest shot ends up too long for handheld, so there the tripod stops being optional.
HDR or graduated filter?
With a clean, straight horizon (sea, plain, lake) the graduated filter resolves the scene in a single file and without motion ghosts. With a horizon broken by mountains, trees or buildings, the graduated filter darkens the peaks and bracketing wins. For the long-exposure part, an ND filter is another tool and doesn't replace either of the two.
What to check before shooting the series
Four checks: aperture and ISO locked in manual, a firm tripod with the stabilizer off, a remote release or 2 s timer, and a test shot at the dark end to confirm no highlights are clipped. If that last one comes out with blown highlights, the whole series was born short.
The 44 cards from Enfogram have the bracketing table printed on them (shots, step and range by scene), so you can set it up with the tripod already planted.
Several exposures, a single natural image