Flash Lighting Without Auto Mode
Flash doesn't just add light: it sculpts the exact mood you need by understanding the relationship between power, aperture, ISO and ambient light.
Fill at −1 EV, bounced off the ceiling and never above 1/200 s sync speed: with those three numbers you get out of almost any interior. Distance decides the rest, and it's decided by a multiplication (GN = distance (m) × f-number at ISO 100), so a flash with a guide number of 36 placed 4 m from the subject calls for f/9. The guide number calculator does that math with ISO already included.
Flash is not just "adding light." It is sculpting light to create the exact mood you need. Flash can be subtle and natural (nobody notices you used it) or dramatic and obvious (an integral part of the style). What decides the result is the relationship between flash power, aperture, ISO and the existing ambient light to create the perfect mix.
How does the light change depending on where I point the flash?
Direct light straight ahead: the result is a well-lit foreground and a dark background, with "flat" light on the subject since it has no contrast or depth.
Pointing upward: bouncing the light off the ceiling spreads it evenly, resulting in diffused light.
Pointing to the side: bouncing the light off a wall or another side surface also gives us diffused light. The subject will be lit from the side the bounce comes from.
Flash can be used connected to the hot shoe or remotely through a radio transmitter. Dark or rough surfaces absorb light instead of bouncing it. It's important to consider this if we bounce the flash off the ceiling or a wall. The color of the surface we bounce a flash off will tint the light with that color.
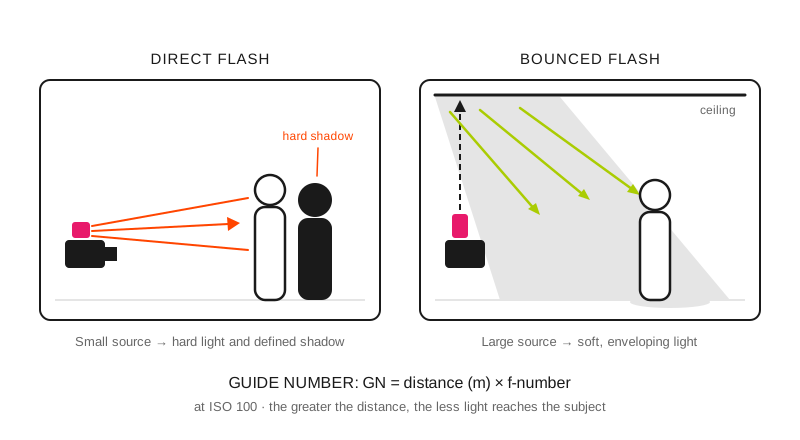
Bouncing the flash off the ceiling enlarges the apparent source: the same light goes from hard to soft.
When is it fill and when is it the main light?
Outdoor fill flash: −1 to −1.7 EV, softens shadows without dominating the scene.
Flash as the main light: +0.3 to +0.7 EV, total control over the lighting.
Bounced flash: directed at the ceiling or wall, wider light and a more diffused, natural finish.
What settings do I use in each scene?
Scene: Interior without windows; Flash position: main, frontal with diffuser; Power: +0.3 EV; Aperture / ISO: f/2.8 · ISO 400; What it costs: the background goes black if you don't expose for the ambient
Scene: Social event; Flash position: bounced off a white ceiling; Power: manual 1/8 – 1/4; Aperture / ISO: ISO 800–1600; What it costs: the bounce eats 1 or 2 stops of power
Scene: Controlled portrait; Flash position: main with softbox or umbrella; Power: manual 1/4; Aperture / ISO: whatever the GN calls for at that distance; What it costs: recycle time between shots
Scene: Fill in full sun; Flash position: frontal, direct; Power: −1 to −1.7 EV; Aperture / ISO: capped at 1/200 s sync speed; What it costs: you're left without wide-open apertures
That last row is the one that surprises you in the field. In full sun (EV 15) and with sync capped at 1/200 s, the widest aperture the exposure allows at ISO 100 is f/13: f/2.8 with flash under the sun doesn't exist without high-speed sync (HSS) or an ND filter, and HSS gives the problem back to you in the form of less power. Setups with metered power and fixed sources are covered in the studio lighting guide; fill step by step, in outdoor fill flash.
The mistakes that cost the most photos
Direct flash from the camera (flat, hard light).
Wiping out the ambient light with the flash (the ideal is to seek a balance).
Using maximum power unnecessarily (flash heating up and short battery life).
Forgetting the camera's maximum sync speed (approx. 1/200 sec).
Pro tips
Favorite formula: flash at −1 EV for natural looks outdoors.
Use a gray card for accurate white balance with flash. If you don't have one, remember that flashes are balanced to direct sunlight.
Start by practicing a single lighting pattern and gradually add more patterns until you master them all.
Flash doesn't illuminate, it shapes light.
Frequently asked questions
Why does the background come out black when I shoot with flash?
Because the flash is exposing the subject and nobody is exposing the ambient. Below the sync speed, shutter speed doesn't change the flash's light but does change all the continuous light: drop to 1/60 s, open the aperture or raise the ISO until the background appears, and then reduce the flash power until the subject fits.
What is the maximum sync speed?
On most cameras it's around 1/200 s. If you shoot faster without enabling high-speed sync, a black band appears in the frame: it's the shutter curtain covering part of the sensor while the flash fires. HSS eliminates the band, but costs several stops of effective power.
What power do I set the fill flash to outdoors?
Between −1 and −1.7 EV relative to the ambient exposure. That range opens up the shadows of the eyes and chin without it being noticeable that flash was used; from 0 EV on, the subject starts to look pasted onto the background.
Does bouncing the flash work outdoors?
No, unless you have a light-colored wall a couple of meters away. Without a ceiling or nearby surface the light is lost and you've just wasted power: outdoors the flash goes direct, with a diffuser if you have one, and you provide the bouncing surface yourself with a reflector.
Does the wall color affect the bounce?
Yes, quite a lot: bounced light arrives tinted with the color of the surface, so a beige wall gives yellow skin and a green one gives sickly skin. Bounce only off white or neutral gray, and if there's no other option, correct the temperature with a gray card before the first shot.
What to check before shooting
Three things, in this order: that the shutter speed is at 1/200 s or below, that the bounce surface is white, and that the power is on manual and not on the automatic that will decide something else on the next shot. If the background matters, expose it first without flash and add the flash afterward.
The 44 cards from Enfogram come with this power and sync table printed on them, so you can consult it with the flash mounted and without letting go of the camera.