Macro Photography: The Miniature World
Macro photography reveals universes invisible to the human eye, where depth of field and focus take on extreme dimensions.

At 1:1 scale and f/8, the sharp zone measures 0.96 mm on full frame. That is the number that explains everything else: focus goes manual, the whole camera moves instead of the ring and the tripod stops being an accessory. The figure comes from the depth of field at 1:1 magnification with a circle of confusion of 0.030 mm.
Macro photography reveals universes invisible to the human eye. At such small distances, concepts like depth of field and focus take on extreme dimensions. A millimeter of movement can ruin the composition.
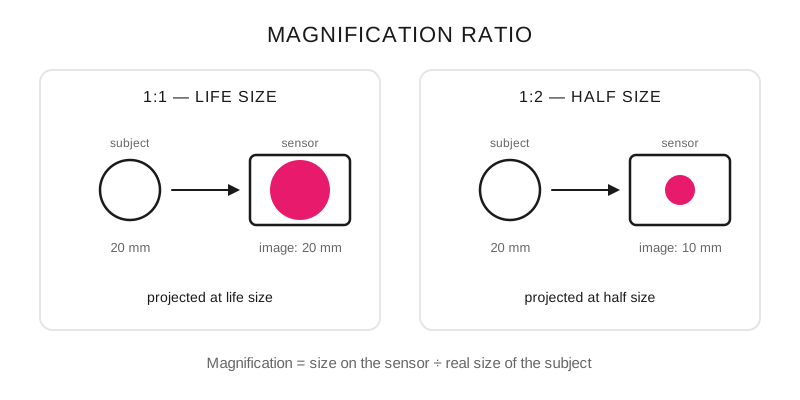
At 1:1 the subject is projected at life size onto the sensor; at 1:2, at half size.
What makes a macro lens different?
They are designed to shoot at a short distance from the subject, but they can also work as everyday lenses.
A macro lens will have a magnification of 1:1 or 1x, that is, a life-size reproduction ratio on the sensor.
The longer the focal length of the lens, the greater the distance it needs between the camera and the subject to achieve 1:1 magnification.
Close-up lenses
Technically they are lenses, but they work more like filters that screw onto the front of the lens.
They reduce the lens's minimum focusing distance so you can get closer to the subject.
The longer the lens's focal length, the greater the magnification you get.
Do extension tubes work?
The tube moves the lens forward, away from the camera's focal plane and therefore closer to the subject. That creates more magnification and closer focus.
Tubes let you focus closer, turning your lens into a macro lens.
Reversing ring
It lets you mount the front element of the lens toward the camera body, that is, the opposite of how it is normally used. It can magnify the subject to almost 3 times its natural size, depending on the lens.
One side of the ring attaches to the front of the lens and the other side to the camera mount.
It is an inexpensive but dangerous technique, since it exposes the rear of the lens to the elements.
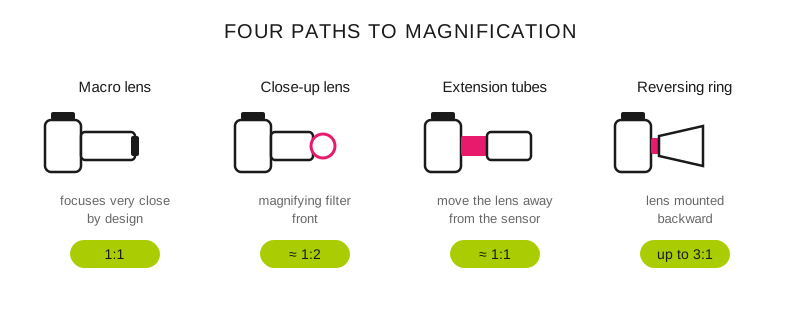
Each accessory brings the plane of focus closer to the subject to increase magnification.
What settings do I use depending on the subject?
Subject: Flowers and plants; Aperture: f/8 – f/11; ISO: 200 – 400; Shutter speed: whatever the light gives, with a tripod; Light: diffused; Sharpness at 1:1 (full frame): 0.96 – 1.3 mm
Subject: Insects; Aperture: f/5.6; ISO: 800 – 1600; Shutter speed: 1/250 minimum; Light: macro flash; Sharpness at 1:1 (full frame): 0.67 mm
Subject: Abstract textures; Aperture: f/11 – f/16; ISO: the lowest; Shutter speed: tripod and remote release; Light: controlled; Sharpness at 1:1 (full frame): 1.3 – 1.9 mm
Subject: Water drops; Aperture: f/8; ISO: 200 – 400; Shutter speed: 1/250; Light: flash to freeze; Sharpness at 1:1 (full frame): 0.96 mm
The last column is the one that decides the shot: at 1:1 magnification the depth of field equals four times the f-number multiplied by the 0.03 mm circle of confusion, so going from f/5.6 to f/16 takes you from 0.67 mm to 1.9 mm and even then a whole insect in profile doesn't fit. Outside the 1:1 scale the numbers grow quickly, and the depth of field calculator gives them for your actual magnification. When even f/16 isn't enough, the way out is focus stacking.
What gear do I set up?
Macro lens: 60mm, 100mm or 180mm depending on working space.
Focus: always manual, magnification in live view.
Stabilization: sturdy tripod, remote release or timer.
Lighting: ring flash, diffusers, reflectors for shadows.
The mistakes that ruin a macro shot
Using wide apertures (insufficient depth of field).
Relying on autofocus at extreme magnifications.
Not controlling the background, distracting elements.
Camera movement from breathing or pulse.
Pro tips
Focusing technique: move the whole camera, not the focus ring.
For insects, use the pre-focus technique on a likely zone.
Focus stacking: take multiple photos with slightly different focus, combine them in post.
In the small lives a whole world.
Frequently asked questions
What does it mean for a lens to be 1:1?
That the subject is projected onto the sensor at its real size: a 20 mm insect takes up 20 mm of the sensor, a little over half the long side on full frame. Below that ratio (1:2, 1:4) the lens gets close, but it isn't macro in the strict sense, and the available depth of field is considerably greater.
Why do my macro photos come out dark even though the light meter says they're fine?
Because at 1:1 the effective aperture is double the marked one: f/8 behaves like f/16 and you lose two stops of light from the extension of the draw. With TTL metering the camera compensates on its own by raising the shutter speed or the ISO, but if you meter with manual flash and guide number you have to add those two stops by hand.
Extension tubes or a macro lens?
Tubes are the cheap entry: they have no glass, don't degrade the image and turn a normal lens into a close-focus one, at the cost of losing infinity and some light. The dedicated macro lens wins in convenience and in quality at short distances, and it's the sensible purchase once macro stops being an occasional experiment.
Do I need flash for macro?
For insects, yes in practice: f/5.6 and ISO 1600 at 1/250 s don't work with the ambient light of a garden in shade, and lowering the shutter speed isn't an option with a moving subject. For flowers and textures with a tripod, natural diffused light is enough and usually looks better, as long as there's no wind.
What to check before shooting macro
Manual focus with magnification on screen, the camera on something stable, the background checked at the actual aperture and your breath held at the moment of the shot. The relationship between aperture, distance and millimeters of sharpness (the same one that becomes extreme here) is covered in the depth of field guide, and the complete workflow of a session in 1:1 macro with manual focus.
The 44 cards from Enfogram come with these apertures and their millimeters of sharpness printed on them, so you can consult them lying on the ground without letting go of the shutter release.